
Introduction
Back in 2016 I wrote this earlier page on querying the NIBE Uplink API using Perl scripts running on a particular flavour of Linux system. Based on the comments and questions received, this clearly proved useful for a number of readers but I’ve been aware for some time that Perl is not (any longer) a popular scripting language and making sense of JSON responses within a Perl script is much more difficult than in some other scripting languages – notably Python. I’ve recently been learning Python for other reasons and found it to be better when handling JSON responses. I’ve therefore re-written the earlier guidance notes to use Python instead. The Python-specific page you are reading now is an updated replacement for the earlier Perl-specific page but contains the same background information. The older page is still there for reference but most people will want to follow this newer page instead.
For readers familiar with the previous notes, be aware I’ve made some minor changes to the instructions:
- The script that requests the tokens now prompts you with the Authorization URL to connect to, so you don’t have to compose that manually from the documented template
- The code examples are now stored in a repository on GitHub rather than being pasted into this page
Since Python is quite tolerant of running on other platforms than Linux I’ve included guidance for running on either Microsoft Windows or a Linux variant such as Raspberry Pi OS. Code examples are written to be as tolerant as possible of different platform requirements. Note that this page assumes the use of a recent release of Python version 3.
Disclaimer
This procedure works for me and I’m publishing it here as a Proof of Concept in case it helps other people trying to accomplish the same objective. It may not work for you. It may not get updated in line with changes to the NIBE Uplink API service. You are responsible for complying with the terms of the NIBE Uplink API Services Agreement and for keeping the application Identifier, Secret and any generated user Tokens confidential.
As with all other material on this Blog this article is published under the terms of the Creative Commons Attribution-ShareAlike 4.0 International License
NIBE Uplink versus myUplink
My NIBE F-Series heat pump, made in 2016, uses the NIBE Uplink API. The new NIBE S-Series heat pumps released in 2020 appear to use the alternative myUplink API (in parallel with the myUplink website). As a result, these instructions are only directly relevant if you have an F-Series heat pump.
Having said that, from a quick look at the myUplink documentation, it appears to be based on almost identical technologies; in particular, it appears to use OAuth2 for Authentication.
My Use Case
I have an 8kW NIBE F1145 Ground Source Heat Pump which is configured to send data to the NIBE Uplink service over the Internet. The uploaded data is accessible via the NIBE Uplink website and via the NIBE Uplink smartphone apps, but those apps use the API ‘under the covers’ and it’s possible to call the API directly from a custom program or script to access all the same data – and then do more interesting things with it.
I have written a script which invokes the NIBE Uplink API on a timed schedule (every 5 minutes) to download the parameters I’m interested in which I then re-publish using MQTT (my personal preference; in no sense essential) to integrate them with temperature data from other sources (Dallas Semiconductor One-Wire sensors and Oregon Scientific temperature / humidity sensors – see other pages on this Blog for more details of those if you’re interested). Everything then gets loaded into an InfluxDB time-series database from which it can be extracted and graphed with Grafana (again my personal preferences but they work well for me).
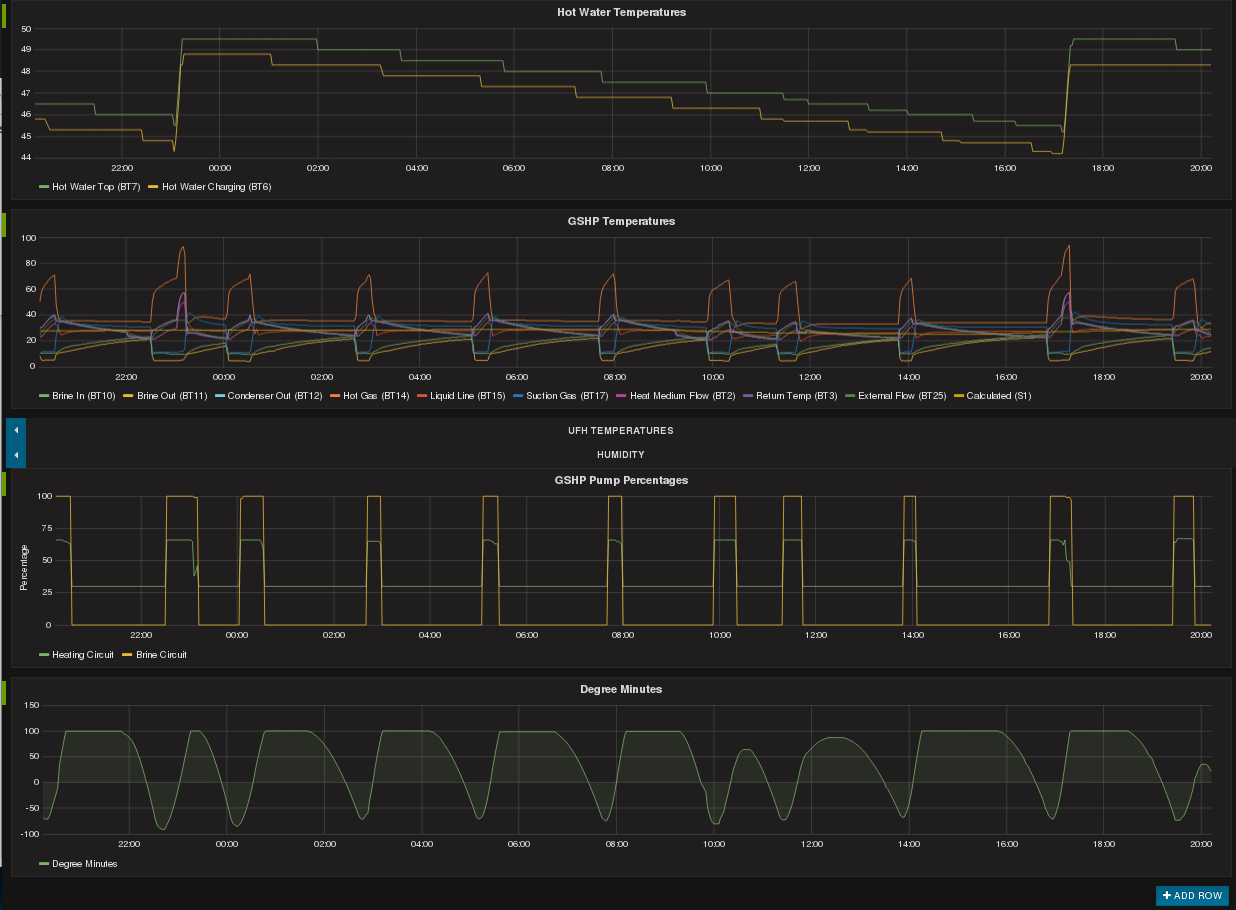
An example of the sort of dashboard generated by Grafana is shown below but to be honest a static screenshot doesn’t do it justice since hovering over any of the graphs displays the numeric data values and clicking on one or more of the labels in a legend shows just those lines (and auto-scales to suit). Scrolling left and right across different time periods and zooming in and out is also easy and slick.
Pre-Requisites
At a bare minimum you will need the following to use this procedure:
- A NIBE Uplink account with at least one (F-Series) heat pump registered to it and reporting data which is viewable via the website or one of the smartphone apps.
- Anyone can use the “Register an account” button on the main NIBE Uplink page to create an account if you don’t have one, but unless you have a heat pump linked to the account the API won’t return any data.
- A computer which is able to access the Internet and which will run the Python script to download data via the API.
- It doesn’t need to be particularly powerful – a Raspberry Pi or similar single-board-computer is perfectly adequate. It could also be a virtual server hosted in the Cloud, or a Windows desktop or laptop.
- It doesn’t need to run a web browser or have a graphical display attached – remote access via a terminal window using a tool like PuTTY or ‘ssh’ is sufficient.
- An Internet-connected computer with a standard graphical web browser (Firefox, Internet Explorer, Safari etc.) which can be used to complete Steps 1 and 2 in the procedure described below. This can be any platform you like – potentially even a Smartphone – and certainly could be the same computer described at Item 2 above if that meets the requirements, though typically it will be a different machine.
- If the computer running the browser is not the same as the one running the script, then ensure you can connect to the computer running the script, since you will need to copy-and-paste a long text string between the two, accurately and quickly.
- A basic knowledge of the Python scripting language, editing files and installing software packages on your chosen platform.
NIBE Uplink API – Documentation and Underpinning Technologies
The official documentation for the NIBE Uplink API is at https://api.nibeuplink.com/docs/v1 (note you need to login to access that page). The detail is described on those pages but in summary:
- It’s a RESTful API accessed over HTTPS
- Data is encoded using JSON
- All requests are authenticated using OAuth2
- This presents the single biggest challenge because you need to obtain a valid Token and then Refresh that whenever it Expires
Personally I found the biggest barrier to getting the API working was understanding what the OAuth2 Callback URL was all about and what would be an acceptable value to use for that (there are several constraints). Actually it’s not all that complicated and it only needs to be used once, in order to initially get an Access Token. Importantly, it’s possible to run some steps in the procedure on different machines (as long as they’re done in quick succession). Here’s a summary of how it works:
- When one of your application’s users (most likely yourself in this scenario) enters their NIBE Uplink credentials in a browser window and agrees to grant your application access to their data, the NIBE Uplink website redirects them to the Callback URL, attaching an Authorization Code which is only valid for a limited time and can only be presented once
- Before the code expires, it’s necessary to present it to the NIBE Uplink Token URL together with other application-specific parameters in order to be allocated an Access Token and an accompanying Refresh Token
- As long as you can get the Authentication Code presented to the Token URL before it expires, you can do that from anywhere – it doesn’t need to be from the same machine as is hosting the Callback URL though that is typically the scenario described in other OAuth2 documentation
I believe it’s necessary for the Callback URL to use HTTPS and since that can be problematic to configure I’m hosting a simple script on the same server as this Blog which anyone should be able to specify as their Callback URL – it will simply print out the generated Authorization Code (or any error message). That URL is: https://www.marshflattsfarm.org.uk/nibeuplink/oauth2callback/index.php (which will complain unless you call it with the right parameters – see later).
(I’m going to assume the nice people at NIBE Uplink will permit multiple applications to be registered which have the same Callback URL – which does indeed appear to be the case.)
If you want to host your own installation of the Callback URL the PHP script code I’m using can be download from GitHub here.
The Python library Requests-OAuthlib is used to hide much of the complexity of OAuth2 processing. The documentation at that link explains how to use that though in principle if you exactly follow the procedure outlined below you don’t need to understand in detail how it works.
Step-By-Step Procedure
Step 0 – Prepare the Python Computer
The computer which will run the script that calls the NIBE Uplink API needs some preparation to ensure the Python environment and the necessary supporting Python libraries are available.
- The first requirement is a working Python3 environment
- On Windows, follow the instructions at Python Releases for Windows
- On Raspberry Pi OS, run:
sudo apt-get install python3
- The second requirement is the Requests-OAuthlib library
- On Windows, use a Command Prompt to run:
pip3 install requests-oauthlib - On Raspberry Pi OS, can install this with:
sudo pip3 install requests-oauthlib- If that doesn’t work, you might need to first run:
sudo apt-get install python3-pip
- If that doesn’t work, you might need to first run:
- On Windows, use a Command Prompt to run:
Step 1 – Register your ‘Application’
The Python script you are about to create that will call the NIBE Uplink API is what the API calls an ‘Application’ so start by Registering the new Application at the NIBE Uplink website so that you get allocated your various unique ID strings which will be required later.
- Connect to https://api.nibeuplink.com/ using your favourite web browser on any machine you like (it does not need to be the machine which will later run the Python script)
- Login with your NIBE Uplink username and password
- Click on the MY APPLICATIONS tab
- Press the red Create application button
- Populate the Name, Description and Callback URL fields – choose your own values for Name (maybe “Python API Script” as shown) and Description and either specify your own Callback URL (if you’ve set one up hosting the PHP code mentioned above) or use https://www.marshflattsfarm.org.uk/nibeuplink/oauth2callback/index.php
- Read the Services Agreement, click to confirm your acceptance of that – at this point the screen should look like the image below:
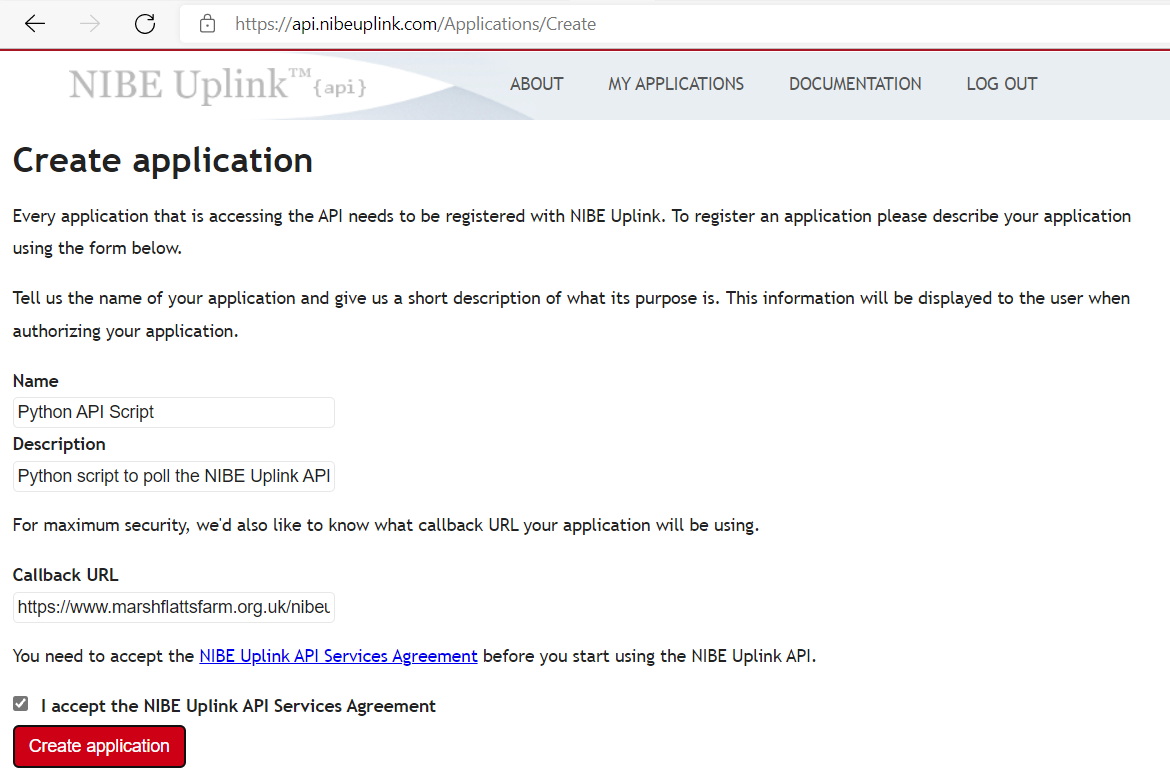
- Press the Create application button
- Record the allocated Identifier and Secret strings and keep them secret! (you can view them later under MY APPLICATIONS if required).
Step 2 – Create an Access Token using an Authorization Code
- Download the first sample Python script from the GitHub repository
- If you’re familiar with GitHub and you have the ‘Git’ client software installed, you might wish to ‘clone’ the repository (don’t worry if those words don’t make sense – do one of the following instead)
- Alternatively, browse to the GitHub repository page and download the
request_token.pyfile - Alternatively, run this command in a terminal window:
wget https://github.com/MarshFlattsFarm/NIBE-Uplink-API/raw/main/request_token.py
- Edit the downloaded Python script with whichever editor you prefer and replace the definitions of
client_idandclient_secretwith the Identifier and Secret strings from Step 1 - In a terminal window, run the command:
python3 request_token.py - The script will display a long URL which you should copy and paste into a Web Browser window
- Assuming you’re already logged in to the NIBE Uplink API website (e.g. having just created your Application) in the same Browser you won’t be prompted for your credentials, otherwise expect to have to enter your Username and Password
- Expect to see a page like the screenshot below (you’ll see the Name you specified rather than “Python API Script” if you changed it). This is NIBE Uplink asking you to grant permission for your script to act on behalf of your user account.
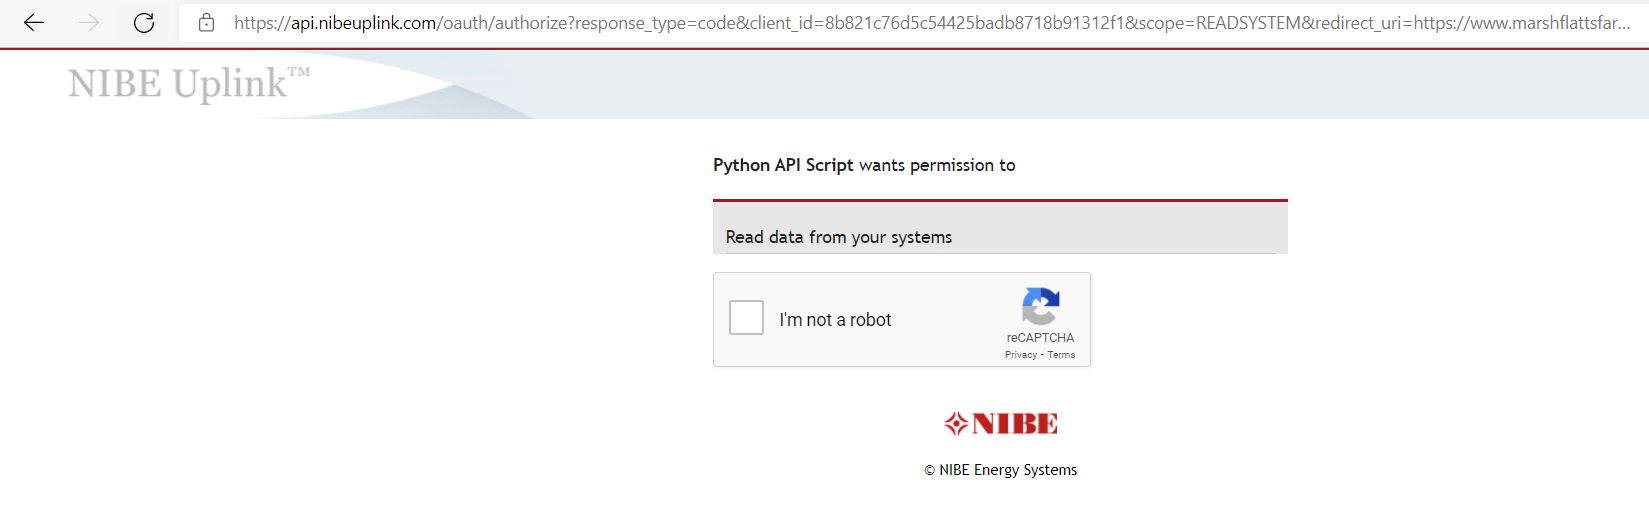
- Convince reCAPTCHA that you’re not a robot, at which point the screen should look like this:
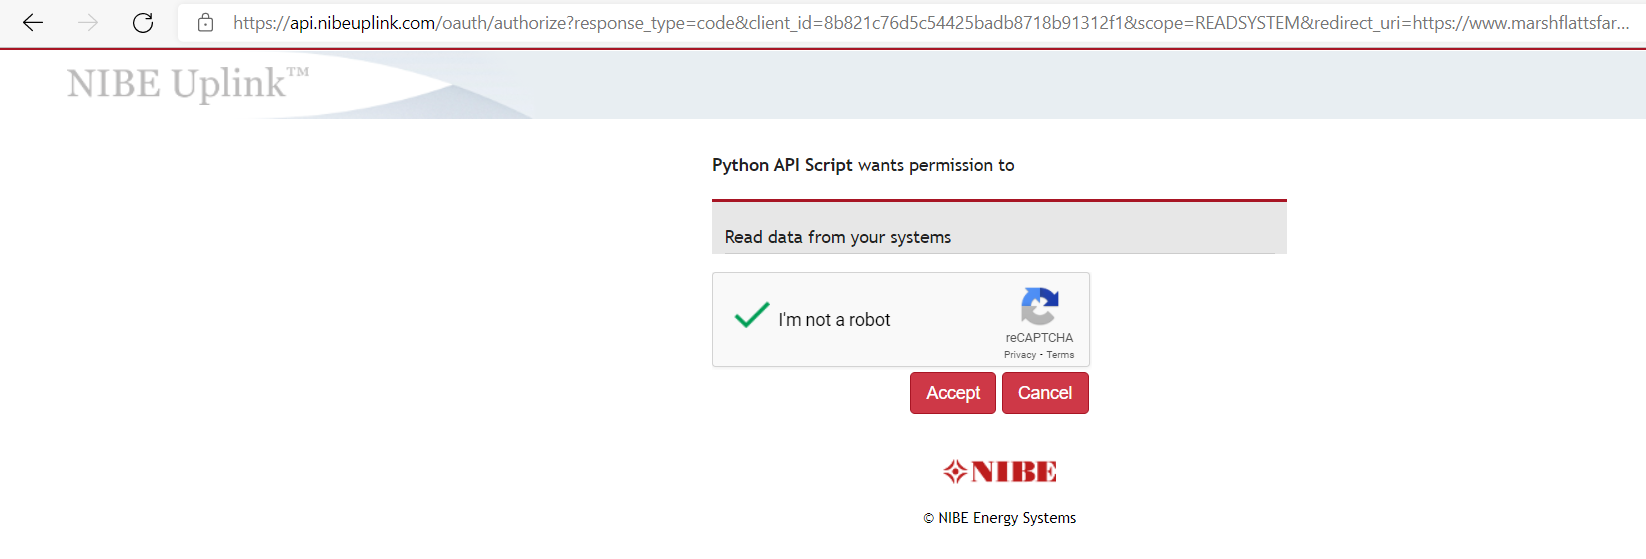
- Press the Accept button
- If everything works you’ll see a very simple web page which looks like the following (which is generated by the Callback URL):

- That value for Parameter ‘code’ (pixelized in the screenshot) is your Authorization Code which you’ll need to copy-and-paste into the terminal window where the Python script will still be waiting – before it expires
- The script should confirm where it has written the Token obtained using the Code – if you see an error message instead the code might have expired, so try the procedure again but paste the code as soon as you see it in the browser
- Note that anyone who can read the file containing the Token will be able to access NIBE Uplink; if it’s on a shared computer you might want to change the permissions to ensure nobody else can read it
Step 3 – Call the NIBE Uplink API
Now we have an Access Token we can actually call the API – and now things are less time-critical because the Token will be automatically renewed as required.
- Download the second sample Python script from the GitHub repository – this one is called:
simple_call_to_protected_api.py - Edit this sample script to set
client_idandclient_secretas before - Run the script with:
python3 simple_call_to_protected_api.py - If it works as expected it will list out the systemId number(s) and model name(s) of the heat pump(s) assigned to your NIBE Uplink account
If that worked OK then you can also try the third sample Python script in the GitHub repository, called: get_parameters_for_categories_for_systems.py
You will have to edit client_id and client_secret as before (the first part of this script is identical to the previous script). This third script:
- Retrieves the list of Systems defined for the authorized User
- For each of those Systems, retrieves a list of defined parameter ‘Categories’
- For each of those Categories, retrieves a list of defined Parameters, together with their Names, Units and current Values
These details are simply printed out but the script could be adapted to publish them as MQTT messages or re-formatted as XML or JSON or similar and sent to a Home Automation system.
JSON Response Formats
Some people have asked for examples of the JSON strings that are returned in response to the NIBE Uplink API calls. I’ve replaced strings like the serial number of my heat pump and my postal address details with XXXXXX’s but otherwise the responses are exactly as returned.
- In response to API call https://api.nibeuplink.com/api/v1/systems
{"page":1,"itemsPerPage":30,"numItems":1,"objects":[{"systemId":XXXXX,"name":"F1145-8, 1x230","productName":"NIBE F1145","productImage":{"name":"NIBE_F1145","sizes":[{"width":75,"height":100,"url":"/Content/Products/F1145_75x100.png"}]},"securityLevel":"ADMIN","serialNumber":"XXXXXXXXXXXXXX","lastActivityDate":"2017-04-17T14:12:41Z","connectionStatus":"ONLINE","address":{"addressLine1":"XXXXXXXXXXXXXXXXX","addressLine2":"XXXXXXXXXX","postalCode":"XXXXXXXX","city":"XXXXX","region":"XXXXXXXXXX","country":"UNITED_KINGDOM"},"hasAlarmed":false}]}
- In response to API call https://api.nibeuplink.com/api/v1/systems/$system/serviceinfo/categories (with $system replaced with the value returned for systemId previously)
[{"categoryId":"STATUS","name":"status","parameters":null},{"categoryId":"CPR_INFO_EP15","name":"compressor module ","parameters":null},{"categoryId":"SYSTEM_1","name":"climate system 1","parameters":null},{"categoryId":"ADDITION","name":"addition","parameters":null},{"categoryId":"AUX_IN_OUT","name":"soft in/outputs","parameters":null},{"categoryId":"SYSTEM_INFO","name":"info","parameters":null}]
- In response to API call https://api.nibeuplink.com/api/v1/systems/$system/serviceinfo/categories/status?categoryId=STATUS (with $system replaced with the value returned for systemId previously)
[{"parameterId":40004,"name":"40004","title":"outdoor temp.","designation":"BT1","unit":"°C","displayValue":"9.8°C","rawValue":98},{"parameterId":40067,"name":"40067","title":"avg. outdoor temp","designation":"BT1","unit":"°C","displayValue":"8.3°C","rawValue":83},{"parameterId":40013,"name":"40013","title":"hot water top","designation":"BT7","unit":"°C","displayValue":"41.4°C","rawValue":414},{"parameterId":40014,"name":"40014","title":"hot water charging","designation":"BT6","unit":"°C","displayValue":"37.9°C","rawValue":379},{"parameterId":43005,"name":"43005","title":"degree minutes","designation":"","unit":"DM","displayValue":"-57DM","rawValue":-578}]
Next Steps
If this procedure works for you, great! Please leave a Comment to let me know. If it doesn’t work or doesn’t makes sense please also leave a Comment and I’ll try to help.
Clearly just printing out the systemIds isn’t very interesting but the NIBE Uplink API Documentation describes the other API calls in some detail.
Further Reading
I found the following resources useful for understanding how to get OAuth2 working:
- The main OAuth2 website
- Aaron Parecki’s OAuth2 Simplified web page
- Programming an OAuth2 Client App in PHP
![]() NIBE Heat Pump Monitoring via NIBE Uplink API (Python Version) by Marsh Flatts Farm Self Build Diary is licensed under a Creative Commons Attribution-ShareAlike 4.0 International License.
NIBE Heat Pump Monitoring via NIBE Uplink API (Python Version) by Marsh Flatts Farm Self Build Diary is licensed under a Creative Commons Attribution-ShareAlike 4.0 International License.