
Introduction
The other pages on this site which describe using scripts to interact with the NIBE Uplink API have proved quite popular, especially in explaining the requirements for OAuth2 Authentication. In late 2023, the NIBE Uplink service is being decommissioned and NIBE heat pump owners are being encouraged to move to the alternative myUplink service, so this page specifically covers that alternative API instead.
It was only the older NIBE F-series heat pumps that used NIBE Uplink anyway; the newer S-series have always used myUplink. Other people have had good success using variants of the NIBE Uplink scripts to access myUplink since the APIs are similar and the authentication requirements are the same, but the structure of the API calls is different (arguably better and simpler – more logical and fewer calls required to return the same data).
This page intentionally duplicates a lot of the content from the earlier NIBE Heat Pump Monitoring via NIBE Uplink API (Python Version) since I expect most new users will arrive at this page and it’s less confusing if the instructions are self-contained and if the screenshots reflect the myUplink look-and-feel.
Disclaimer
This procedure works for me and I’m publishing it here as a Proof of Concept in case it helps other people trying to accomplish the same objective. It may not work for you. It may not get updated in line with changes to the myUplink API service. You are responsible for complying with the terms of the myUplink API Services Agreement and for keeping the application Identifier, Secret and any generated user Tokens confidential.
My Use Case
I have an 8kW NIBE F1145 Ground Source Heat Pump which was installed in 2016 and was originally configured to send data to the NIBE Uplink service. Towards the end of 2023 NIBE have been migrating NIBE Uplink users over to the newer myUplink service and these notes were written in support of that migration.
The uploaded data is accessible via the myUplink website and the myUplink smartphone app, but those apps use the API ‘under the covers’ and it’s possible to call the API directly from a custom program or script to access all the same data – and then do more interesting things with it.
I have a script which invokes the myUplink API on a timed schedule (every few minutes) to download the parameters I’m interested in which I then re-publish using MQTT (my personal preference; in no sense essential) to integrate them with data from other sources (Meter-Bus electricity and heat meters, Dallas Semiconductor One-Wire sensors, Oregon Scientific temperature / humidity sensors – see other pages on this Blog for more details of those if you’re interested). Everything then gets loaded into an InfluxDB time-series database from which it can be extracted and graphed with Grafana (again my personal preferences but these tools work well for me).
At the risk of straying even further off-topic, some of my myUplink data gets further re-published to HeatpumpMonitor.org (a community dashboard of heat pump performance data). Since that also needs a feed of Electricity Consumption and Heat Output data, which are not part of the myUplink dataset, I found it easier to source the data from InfluxDB and upload to emoncms.org (which drives HeatPumpMonitor.org) in one go.
Pre-Requisites
At a bare minimum you will need the following to use this procedure:
- A myUplink account with at least one NIBE heat pump registered to it and reporting data which is viewable via the website or one of the smartphone apps.
- Anyone can use the “Register an account” button on the main myUplink page to create an account if you don’t have one, but unless you have a heat pump linked to the account the API won’t return any meaningful data.
- It doesn’t strictly have to be your own heat pump; other people can grant your myUplink account ‘Viewer’ access to their heat pump.
- A computer which is able to access the Internet and which will run the Python script to download data via the API.
- It doesn’t need to be particularly powerful – an old Raspberry Pi or similar single-board-computer is perfectly adequate. It could also be a virtual server hosted in the Cloud, or a Windows desktop or laptop.
- It doesn’t need to run a web browser or have a graphical display attached – remote access via a terminal window using a tool like PuTTY or ‘ssh’ is sufficient.
- An Internet-connected computer with a standard graphical web browser (Firefox, Chrome, Edge, Safari etc.) which can be used to complete Steps 1 and 2 in the procedure described below. This can be any platform you like – potentially even a Smartphone – and certainly could be the same computer described at Item 2 above if that meets the requirements, though typically it will be a different machine.
- If the computer running the browser is not the same as the one running the script, then ensure you can connect to the computer running the script, since you will need to copy-and-paste a long text string between the two, accurately and quickly.
- A basic knowledge of the Python scripting language, editing files and installing software packages on your chosen platform.
myUplink API – Documentation and Underpinning Technologies
The official documentation for the myUplink API is at https://dev.myuplink.com/ (note you need to login to access that page). The detail is described on those pages but in summary:
- It’s a RESTful API accessed over HTTPS
- Data is encoded using JSON
- Requests are authenticated using OAuth2
- OAuth2 presents the single biggest challenge for using the API because you need to obtain a valid Token and then Refresh that whenever it Expires
The older NIBE Uplink API only supported OAuth2’s Authorization Code Grant Flow (also known as the Web Application Flow); the myUplink API also supports OAuth2’s Client Credentials Grant Flow (also known as the Backend Application Flow) which appears somewhat simpler. The current page concentrates on the Authorization Code Grant Flow since that replicates the old NIBE Uplink behaviour. There’s more info on the Authentication options at https://dev.myuplink.com/auth and probably the simpler Client Credentials Grant Flow would be a better match to the requirements of most hobbyist users. Maybe I’ll address that in a future update to this page.
Personally I found the biggest barrier to getting the API working was understanding what the OAuth2 Callback URL was all about and what would be an acceptable value to use for that (there are several constraints). Actually it’s not all that complicated and it only needs to be used once, in order to initially get an Access Token. Importantly, it’s possible to run some steps in the procedure on different machines (as long as they’re done in quick succession). Here’s a summary of how it works:
- When one of your application’s users (most likely yourself in this scenario) enters their myUplink credentials in a browser window and agrees to grant your application access to their data, the myUplink website redirects them to the Callback URL, attaching an Authorization Code which is only valid for a limited time and can only be presented once
- Before the code expires, it’s necessary to present it to the myUplink Token URL together with other application-specific parameters in order to be allocated an Access Token and an accompanying Refresh Token
- As long as you can get the Authentication Code presented to the Token URL before it expires, you can do that from anywhere – it doesn’t need to be from the same machine as is hosting the Callback URL though that is typically the scenario described in other OAuth2 documentation
I believe it’s necessary for the Callback URL to use HTTPS and since that can be problematic to configure I’m hosting a simple script on the same server as this Blog which anyone should be able to specify as their Callback URL – it will simply print out the generated Authorization Code (or any error message). That URL is: https://www.marshflattsfarm.org.uk/nibeuplink/oauth2callback/index.php (which will complain unless you call it with the right parameters – see later).
If you want to host your own installation of the Callback URL the PHP script code I’m using can be download from GitHub here.
The Python library Requests-OAuthlib is used to hide much of the complexity of OAuth2 processing. The documentation at that link explains how to use it though in principle if you exactly follow the procedure outlined below you don’t need to understand in detail how it works.
Step-By-Step Procedure
Step 0 – Prepare the Python Computer
The computer which will run the script that calls the myUplink API needs some preparation to ensure the Python environment and the necessary supporting Python libraries are available.
- The first requirement is a working Python3 environment
- On Windows, follow the instructions at Python Releases for Windows
- On Raspberry Pi OS, run:
sudo apt-get install python3
- The second requirement is the Requests-OAuthlib library
- On Windows, use a Command Prompt to run:
pip3 install requests-oauthlib - On Raspberry Pi OS, can install this with:
sudo pip3 install requests-oauthlib- If that doesn’t work, you might need to first run:
sudo apt-get install python3-pip
- If that doesn’t work, you might need to first run:
- On Windows, use a Command Prompt to run:
Step 1 – Register your ‘Application’
The Python script you are about to create that will call the myUplink API is what the API calls an ‘Application’ so start by Registering a new Application at the myUplink website so that you get allocated your various unique ID strings which will be required later.
- Connect to https://dev.myuplink.com/ using your favourite web browser on any machine you like (it does not need to be the machine which will later run the Python script)
- Login with your myUplink username and password
- Click on the Applications tab (or go to https://dev.myuplink.com/apps)
- Press the grey Create New Application button on the left
- Populate the Name, Description and Callback URL fields
- Choose your own values for Name (maybe “Python API Script” as shown) and Description and either specify your own Callback URL (if you’ve set one up hosting the PHP code mentioned above) or use https://www.marshflattsfarm.org.uk/nibeuplink/oauth2callback/index.php
- Read the Services Agreement, click to confirm your acceptance of that – at this point the screen should look like the image below:
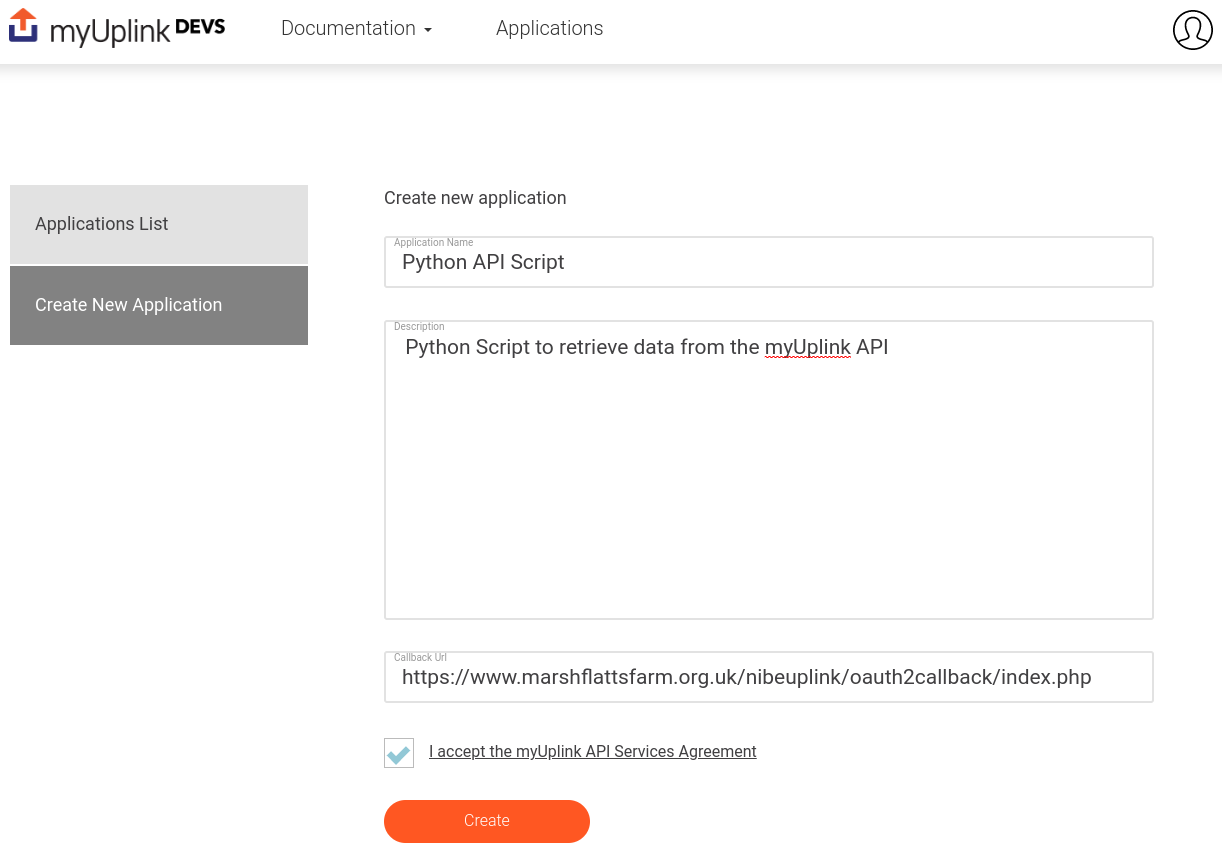
- Press the Create button
- Record the allocated Client Identifier and Client Secret credentials and keep them secret! (you can view them later under Applications if required)
Step 2 – Create an Access Token using an Authorization Code
- Download the first sample Python script from the GitHub repository
- If you’re familiar with Git(Hub) and you have the ‘git’ client software installed, you might wish to ‘clone’ the repository (don’t worry if those words don’t mean anything to you – do one of the following instead)
- Alternatively, browse to the GitHub repository page and download the
request_token.pyfile - Alternatively, run this command in a terminal window:
wget https://github.com/MarshFlattsFarm/myUplink-API/raw/main/request_token.py
- Edit the downloaded Python script with whichever editor you prefer and replace the definitions of
client_idandclient_secretwith the Client Identifier and Client Secret strings from Step 1 - This next bit (as far as Step 9) is the time-sensitive bit: In a terminal window, run the command:
python3 request_token.py - The script will display a long URL which you should copy and paste into a Web Browser window
- If you’re already logged in to the myUplink API website (e.g. having just created your Application) in the same Browser you might not be prompted for your credentials, otherwise expect to have to enter your myUplink Username and Password
- Expect to see a page like the screenshot below (you’ll see the Name you specified rather than “Python API Script” if you changed it). This is myUplink asking you to grant permission for your script to act on behalf of your user account.
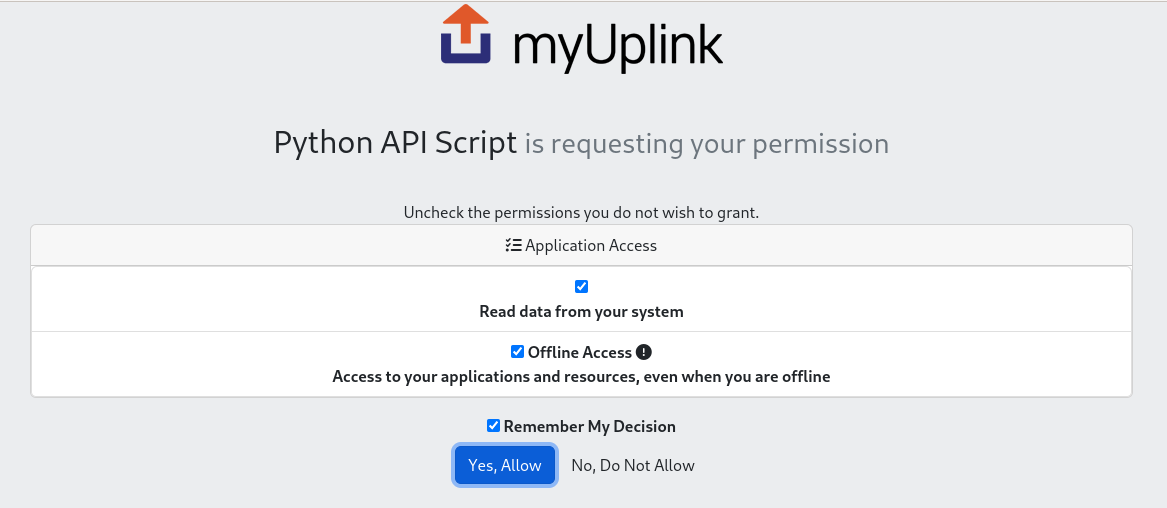
- Press the Yes, Allow button
- If everything works you’ll see a very simple web page which looks like the following (which is generated by the Callback URL):

- That value for Parameter ‘code’ (pixelized in the screenshot) is your Authorization Code which you’ll need to copy-and-paste into the terminal window where the Python script will still be waiting – before the code expires
- The script should confirm to which file it has written the Token obtained using the Code – if you see an error message instead the code might have expired, so try the procedure again but paste the code as soon as you see it in the browser
- Once you get confirmation the Token has been written to file, that’s the time-sensitive part of the procedure completed. The file includes both a ‘currently-valid’ token and also a second token which can be used to refresh the token when it expires.
- Note that anyone who can read the file containing the Token will be able to access the myUplink API as your account; if it’s on a shared computer you will want to change the permissions to ensure nobody else can read it
Step 3 – Call the NIBE Uplink API
Now we have an Access Token we can actually call the API – and now things are less time-critical because the Token will be automatically renewed as required.
- Download the second sample Python script from the GitHub repository – this one is called:
simple_call_to_protected_api.py - Edit this sample script to set
client_idandclient_secretas before - Run the script with:
python3 simple_call_to_protected_api.py - If it works as expected it will list out the systemId number(s) and name(s) of the heat pump(s) assigned to your myUplink account
If that worked OK then you can also try the third sample Python script in the GitHub repository, called: get_DevicePoints_for_Devices_for_Systems.py
You will have to edit client_id and client_secret as before (the first part of this script is identical to the previous script). This third script:
- Retrieves the list of Systems defined for the authorized User, together with their associated Devices
- For each of those Devices, retrieves the associated DataPoints (like BT1, the Outdoor Temperature)
These details are simply printed out but the script could be adapted to publish them as MQTT messages or re-formatted as XML or JSON or similar and sent to a Home Automation system or database.
Next Steps
If this procedure works for you, great! Please leave a Comment to let me know. If it doesn’t work or doesn’t makes sense please also leave a Comment and I’ll try to help.
Clearly just printing out the systemIds isn’t very interesting but the myUplink API Documentation describes the other API calls in some detail.
Further Reading
I found the following resources useful for understanding how to get OAuth2 working:
- The main OAuth2 website
- Aaron Parecki’s “OAuth2 Simplified” web page
- Programming an OAuth2 Client App in PHP
![]() NIBE Heat Pump Monitoring via myUplink API by Marsh Flatts Farm Self Build Diary is licensed under a Creative Commons Attribution-ShareAlike 4.0 International License.
NIBE Heat Pump Monitoring via myUplink API by Marsh Flatts Farm Self Build Diary is licensed under a Creative Commons Attribution-ShareAlike 4.0 International License.
This article helped me a lot to get a step closer in controlling my alpha-innotec heat pump (which is technically NIBE) with my Loxone home automation.
Kai
Dear David,
Your instructions are crystal clear and work every time again, first with NIBE uplink and now with myUplink … 10 minutes execution time after copying your files from GitHub following your instructions! First time right :-).
Pity that NIBE seems to miss some parameters like BT7 and BT63 but we will work around that plenty of temperature probes lying around 🙂
Thanks, Marc
Thanks for the feedback Marc. It’s always good to get feedback about these instructions working (or not!) for different people and different use-cases.
Other people have noted the disappearance of BT7 with myUplink and have raised the issue with NIBE – who have advised they plan to re-add it in a later firmware version.
David
Many Thanks, great work and easy to follow steps. It worked on my system with first try.
I was already using your previous method on the old Nibe uplink and now I could install the same for myUplink in no time.
As I would like to use MQTT, do you have any examples of a suitable python script?
Yes, certainly. I will add an example Python script that Publishes to MQTT to the GitHub repository and add another comment here with a link to that once it’s ready.
David
Hi Urs,
I have just uploaded a new example Python script to the GitHub repository: https://github.com/MarshFlattsFarm/myUplink-API/blob/main/myUplink2MQTT.py
It will need a few edits where I’ve written “Replace this” for details of your own MQTT Broker etc, but otherwise should work well enough for you to adapt for your own purposes.
David
i was fearing this forced migration from nibeuplink after years of having set it up initially. then stumbled on your website and the myuplink article. the step-by step tutorial could not be more precise and clear, the software is perfect, a great great help!
the biggest burden for me has been to get my old system to install mosquitto and python3 from old raspberry OS archives, the rest has been effortless thanks to your guide, thanks so so much!!
Thanks for taking the time to leave the positive feedback Olivier. I’m pleased that the guide and example scripts are proving useful to other NIBE customers.
In general, I’ve been finding myUplink is ‘better’ than NIBE Uplink – the developers appear to have learned from their experience, and it’s taking fewer API calls to achieve the same result (so I’m ‘polling’ the API every minute, rather than every 2 minutes).
So, while it is definitely ‘different’, making the effort to migrate is worthwhile.
David
Dear David,
indeed the new API seems pretty stable and probably streamlined which is good. However i’ve found that the support is not as good as it used to be on the old API. For instance, it seems that not all parameters have been migrated for some reason, or at least in a way which i didn’t manage to always guess. For instance the “Status Blocked” parameter which is for me fundamental to find out when an alarm is raised and blocking the pump is missing for me (on an Nibe F1145) and did not find an equivalent. The tech support did not help there, it seems they don’t know too much about the Nibe parameters themselves and rather support the API mechanics only. When i find a bit of time I hope to find these answers via some blog or users having the same issue… Anyway, all the best to you, and again thanks for your work!
I can’t argue with your assessment in any way. My view of ‘better’ was in terms of the IT design (e.g. the number of API calls required to retrieve parameter values) but as you’ve pointed out the *content* is somewhat lacking compared with NIBE Uplink. I do see some evidence of some missing parameters being added – for example BT7 (one of the DHW tank readings) was initially missing but has since been added.
Dear David,
this is exactly the code I was looking for!
Easy to follow instructions and plenty of parameters.
I’m just now trying to send to my mqtt broker but I have
problem with the paho-mqtt client.
I did a pip install paho-mqtt but the program complains about
unsupported callback API version. Is there more to install?
I do want to use mqtt because in my opinion that’s the best
way to send data between systems.
Sivert
Dear David,
I’ve changed to mqtt.Client(mqtt.CallbackAPIVersion.VERSION2)
but I think there’s more to change for paho-mqtt-2.1.0
Where can I find an older version?
I’m using paho-mqtt client in Android phone app
Sivert
Dear David,
I found and installed paho-mqtt-1.6.1 and it works OK.
Sorry for disturbing.
Sivert
Thanks for good tutorial.
Gone thru many times now, two different myuplink accounts with systems, can see on web and app.
But when trying to get them via php script, all i get is 0 systems returned by api..
ANY ideas what’s wrong?
When implementing your tutorial, there was no errormessages at any point.
Both accounts shows permissions for own app (php-script).
Have to correct my writings.
Meaning “php-script” meaning YOUR python-scripts. 🙂
Still, no go, tried couple of times again. 🙂
And to mention, I have Mitsubishi air-to-water pumps.
But that should not make any difference, should it?
Also, testing with swagger also fails to show any systems, so main reason is somewhere in bit-land..
Also bit concerning was fact that at myUplink profile page showed permission to some unknown apps, added after my own testings.
To close this case with Mitsubishi pumps: (my previous message not even public yet but here we go)..
“Unfortunately, we no longer support an open api for your brand, if you have questions about it, we can refer you to your manufacturer for further questions.”
Direct answer from myUplink support..
So keep on going, I’m going to do some emailing to somebody else.. 🙂
Very clear tutorial, thanks for that!
Via the old NibeUplink API i was able to retreive the active compressor status like cooling, heating or hotwater. With use of MyUplink the parameter list is very long, but I can’t find this specific data from the SMO40. Any suggestions?
Thanks Kees. I’m pleased to hear that you got it working OK.
You’re correct in saying there are a LOT of parameters that come back. For myUplink, NIBE seem to have decided to report all the semi-static configuration parameters relating to daily schedules etc. which adds a large quantity of extra parameters.
For compressor status, I don’t appear to get anything like that for my system but other users have advised that ParameterId 49994, ParameterName ‘Priority’ provides that information, so I’d suggest checking if you have that reported for your SMO40, and if so whether the value changes as you’d expect. (For my F1145, ParameterId 49994 is not included in the list.)
David
Hi David, thans for your reaction!
Unfortunately, that parameter does not appear in my list as well and the name “Priority” isn’t found also. I do have parameter 44061 (Status compressor (EB101)) but this does not provide all the information…
Via “https://myuplink.com/device-settings” the actual compressor status is visable, so the information is apparently available via API. Could it be that this is only available via API with a premium subscription?
Anything your myUplink account is permitted to see on myuplink.com should also be accessible via the API (since the web page is just using the API ‘under the covers’). For my system, “Status com-pressor” is 43427 – but that only seems to show whether the compressor is running or not; the value doesn’t appear to change for Heating versus Hot Water.
It’s possible that a Premium subscription will make this information available via the API. If you can see the information you need in a Web Browser you might be able to use the Developer Tools in the Browser to work out which ParameterId is feeding the web page.
I finally found it! Parameter Id 50096 from my SMO40 gives the desired info. The data is a numeric value witch can be linked to the actual compressor status.
15003 = off
15004 = hotwater
15005 = heating
10187 = defrost
xxxxx = cooling (dbt)
Excellent! Well done in tracking that down for your SMO40. My system doesn’t have 50096 – it seems this operational status parameter is reported quite differently for different models.
So, it would seem that:
Hi Kees. Your success motivated me to look in more detail at my own data, and I find my F1145 has 50095 which takes the same numeric values as you found (15004 = DHW; 15005 = Heating etc.) so it would appear that parameters in the 5009x range often carry this data.
David
Hi,
First of all, thank you for the API; I’ve been using it for a long time. However, after upgrading to myUplink, the information about current (amperes) has disappeared, which I used to integrate consumption in kWh. I did find the parameter 50113 (kW) in the output of get_DevicePoints_for_Devices_for_Systems.py, but it doesn’t change. The SMO20 displays information about consumed energy after the update (a simple graph), so the consumption data must exist somewhere. I would like to access it via the API. Any ideas?
Jan
Dear David, I’ve now used your API for some time and it’s very stable.
However I’ve made yet another version of you python program where I select useful Id in JSON format and publish them to a MQTT broker. Another subscribe program sends update to my Domoticz system. I’m just now testing SPA Smart Price Adaption and maybe I will select more Id later. Here are my selected Ids for Nibe F750 right now:
“40004”: Current outd temp (BT1)
“40008”: Heating medium supply (BT63)
“40012”: Return line (BT3)
“40013”: Hot water top (BT7)
“40014”: Hot water charging (BT6)
“40025”: Exhoust air (BT20)
“40026”: Extract air (BT21)
“40033”: Room temperature (BT50)
“40067”: Average outdoor temp (BT1)
“40079”: Current A (BE3)
“40081”: Current A (BE2)
“40083”: Current A (BE1)
“40941”: Degree minutes
“41778”: Current compressor frequency
Sivert
Great! It works from 1st trial… Many thanks!
Hello David. A big thank you for this, i’ve worked through your tutorial and got it working and pulling data and printing it to screen.
Would you be able to share your python scripts that take this data and append into a ms_access table?
Hi Alan. It’s good to hear you got the basic integration working.
My approach is to poll the myUplink API and write the data fields as MQTT messages, which then get processed by an existing data pipeline, ending up in an InfluxDB database.
I therefore don’t have any example scripts which write direct to a database. You’ll probably want to use pyODBC for the database interaction; hopefully by combining my example scripts for the myUplink API and some other examples for appending to an MS Access table you’ll be able to get something working.
David
Ok, that makes sense.
So is it this data that you are then using as the source for openenergy monitoring?
Yes and no. The data that goes to openenergymonitor (to feed the heatpumpmonitor.org dashboard) is mostly sourced elsewhere than myUplink. The most important readings come from separate Heat and Electricity meters which are read using m-bus (Meter-bus) – but I augment those with a couple of parameters from myUplink (Outside Temperature, BT1, and Calculated Target Temperature, S1). All the data, from whichever source, comes together in MQTT and hence in InfluxDB so I can extract it from InfluxDB and feed it out from there.
Hi David, as of 13:00 CET my link to MyUplink was broken, needed to request a new link inside the SMO40, then had to try to get a new code, but the callback to your code generation https://www.marshflattsfarm.org.uk/nibeuplink/oauth2callback/index.php did not yield anything … page unknown … similar with a service for Node-RED … is this me only or are more people having problems ? regards, marc
Hi Marc,
I’ve just done a quick test and the oauth2callback page you linked is responding OK for me, so might only be an issue for you?
David
David, thanks for the check, got work to do :-), regards
, Marc
Hi David,
all fine, used an old Nibe not MyUplink file … my bad, should clean out the old stuff so do not get confused, all working 100% again. thanks for the quick check and support, marc.
Hello, great website. I wondered whether you had successfully integrated your heat pump with Home Assistant so that you are able to actually control it locally (not via myuplink) and not just read data from it? I have the F1355 and am struggling.
Hi. I’ve not pursued any local integration options, no.
I took the view that since the unit wanted to connect to NIBE Uplink (originally; now migrated to myUplink) *anyway* it was easier to integrate via that route – albeit with a reliance on an Internet connection and the myUplink servers.
I believe the newer S-series units come with MODBUS over TCP available as standard, but for (some of) the older F-series units NIBE expect you to purchase their Modbus 40 comms unit which is very expensive – so some folks have been working on alternatives.
Presumably you’re familiar with this thread on the Home Assistant Community site: https://community.home-assistant.io/t/how-to-connect-to-nibe-heat-pump-without-the-cloud/381099 ?
There are some pointers on there to https://github.com/anerdins/nibepi/blob/master/README.en.md but it’s not clear whether that supports *control* as well as *reading* data.
David
Hi David, I have actually got this working now. I am using this integration: https://www.home-assistant.io/integrations/nibe_heatpump/#udp-gateway-using-nibegw and have made a NibeGW using a LilyGo T-CAN485 board flashed with ESPHome. You have to wire this into the Nibe’s MODBUS40 connectors. This is all explained in the linked website and I was (to my surprise) able to follow it reasonably easily.
Once installed it creates a total of 1,633 entities! I am yet to really try it out but my sense is that it allows you to do pretty much anything that you can do on the heat pump’s physical display. So in that regard, it is quite a bit more powerful than the myuplink interface. For now I am just using it to trigger temporary lux when my electricity is cheap (which I realise was possible on myuplink). A firmware update had stopped the myuplink connection working which is what led me down this path in the first place – I’m glad to have a local connection now.
All the best
Thanks a lot for this awesome tutorial! 🙂
I used my own https-server for the callback.
It worked flawless and now I can read the temperatures from my heat pump.
Hi Patrick. Thanks for confirming this procedure is still working for you (and other new users). I’m pleased to hear you found it useful.
David
Dear all,
I’ve been reading this post with great interest. I recently joined NIBE Energy Systems, the UK arm of NIBE, as National Partnerships Manager.
Firstly, a big thank you to everyone here – it’s really encouraging to see such an active and supportive community of NIBE heat pump owners sharing knowledge and experiences. And a special thanks to David and the Marsh Farm Flats Self Build Diary for developing the API scripts and guidance – fantastic work.
At NIBE, we’re always on the lookout for new case studies. We’d love to hear your stories and experiences of having a NIBE system installed and living with it. If you’re interested in sharing your journey, please feel free to reach out to me at matt.sheen@nibe.co.uk
Thanks again, and best wishes to everyone with your NIBE systems.
Best regards,
Matt Sheen
National Partnerships Manager
NIBE Energy Systems UK