
Introduction
Almost all KNX installations need to connect to a TCP/IP computer network:
- For programming and configuration using the ETS application
- Unless some other type of interface is used to connect the computer running ETS to the KNX bus – perhaps a USB interface
- For controlling KNX-connected devices such as lights and blinds from scheduled automation rules or a smartphone application user interface – both typically implemented using home automation ‘hub’ software such as Home Assistant, needing access to KNX via the computer network
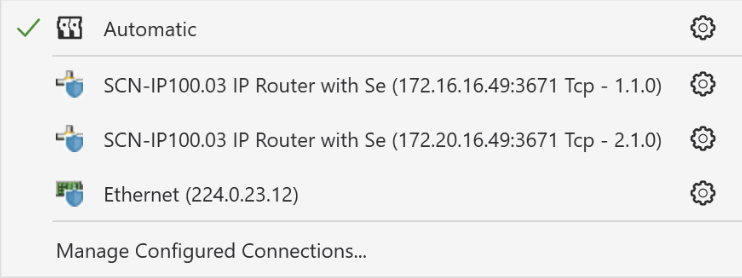
For simple KNX installations it’s very straightforward: a connection to a KNX IP Interface device is made using a KNX ‘Tunnel’ over the TCP/IP network:
- For older installations, this tunnel connects using UDP Port 3671
- For more recent installations using KNX IP Secure, the tunnel must use TCP Port 3671
In both cases, these are point-to-point (Unicast) connections, direct from Source to Target IP addresses. Such connections work fine via Routers / Firewalls (as long as the correct firewall rules are in place) although ‘automatic discovery’ rarely works when Source and Target are on different network segments and manual configuration of the IP Interface ‘server’ address is generally necessary.
Things get rather more complicated with KNX installations that have multiple KNX line segments and multiple KNX IP Interfaces.
KNX IP Routing via IP Multicast
Where a KNX installation spans multiple floors of one large building – and especially where it spans multiple buildings – it is customary to divide the installation into multiple separate KNX bus cables (‘lines’ in KNX terminology; each with their own KNX bus power supply) and to enable KNX devices on the separate cables to communicate with each other by ‘routing’ the inter-cable KNX traffic over an IP network.
This ‘KNX routing’ terminology is problematic for people familiar with ‘IP routing’ concepts, since it really isn’t the same. There’s a good description of the differences at KNX Tips and Traps Part 2: KNX/IP Routing which concludes that ‘KNX routing‘ is effectively ‘Layer 2 bridging‘ – with some traffic filtering added, for good measure.
The filtering comes about because a key benefit of splitting a KNX installation into multiple separate ‘lines’ is that (most of) the KNX traffic is restricted to one ‘line’, reducing contention on the KNX bus (which is effectively just 9600 baud serial communications under the covers). Unfiltered bridging would just propagate all the traffic to all the lines – so instead there are filter tables which govern what traffic should be propagated, and what should not.
These bridging tables are populated automatically by the ETS software when e.g. a KNX device Input on one ‘line’ is connected to an Output on another ‘line’, but ETS does not know what is expected when an application like Home Assistant is being used to access multiple devices on the KNX bus.
From an Ethernet network cabling standpoint, the requirement is straightforward: each KNX IP Interface needs to connect to an Ethernet switch port which presents an IP subnet that provides DHCP, DNS and NTP services – and which enables KNX IP Multicast traffic to reach all other KNX IP Interface devices on the site. See this separate page for more detail on the Multicast connectivity aspects.
TCP/IP Connectivity for ETS and Home Assistant
While the IP Multicast traffic takes care of connecting one KNX Bus ‘line’ to the other KNX Bus ‘lines’ on the site:
- The ETS application still needs to connect to all the devices on each ‘line’ in order to program them
- Home Assistant needs to connect to all the (output) devices on all lines, in order to control them
One option is to have ETS and / or Home Assistant also use IP Multicast communications. For ETS, IP Multicast seems a good option and ‘simply’ requires that IP Multicast traffic is propagated from the network where ETS is running to the network(s) where the KNX IP Router devices are connected.
For Home Assistant, there’s information on how to set up IP Routing in the Home Assistant KNX documentation. In essence, this requires a “Dummy” KNX device and it needs all of the Group Addresses that Home Assistant might want to interact with associating with that Dummy device in ETS, so that the filter tables are populated to allow the traffic to pass. However this proved to be problematic – perhaps due to firewall issues.
Another option is to use ‘Tunnel’ connections for both ETS and Home Assistant – which is fine for reaching devices on the ‘line’ connected to the KNX IP Interface on which the ‘Tunnel’ terminates, but not so good for reaching devices on other ‘lines’. The issue is the filter tables which – by default – block KNX traffic they’ve not been told about. ETS can be told about multiple Tunnel connections, so that’s not so bad – but Home Assistant can only have a single Tunnel connection – or a Routed (IP Multicast) connection.
ETS allows Group Addresses to be associated with one of the Tunnel endpoint addresses – so that those get populated into the filter rules. When configuring Home Assistant to connect to a Tunnel endpoint, it is necessary to specify the ‘User’ to use – and their password. This means that the specific Tunnel that Home Assistant uses is pre-defined – and that is the Tunnel which can have Group Addresses added to populate the filter rules.
Given that the House has the vast majority of the KNX complexity, the best option is to have Home Assistant connect via a Tunnel to the House’s KNX IP Router (so all the devices on the same ‘line’ as that Router can be accessed directly) – then it’s only necessary to add the Group Addresses for the Outbuildings’ devices to the Tunnel connection that Home Assistant uses (in order to have the filter tables in the two IP Router devices populated correctly).
Note that when adding further Group Addresses on the ‘other’ KNX network segments, it’s necessary to add those to the Tunnel (generally best done by dragging the top-level Group Addresses onto the Tunnel – which will add any bottom-level Group Addresses not already present). It will also be necessary to do a Partial Download to all of the KNX IP Routers – since those will need their filter tables updating.
![]() TCP/IP Connectivity for a KNX Installation by Marsh Flatts Farm Self Build Diary is licensed under a Creative Commons Attribution-ShareAlike 4.0 International License.
TCP/IP Connectivity for a KNX Installation by Marsh Flatts Farm Self Build Diary is licensed under a Creative Commons Attribution-ShareAlike 4.0 International License.