
Update, September 2021
There is now a new version of this page available, based on using the Python scripting language instead of Perl. For the new page, see NIBE Heat Pump Monitoring via NIBE Uplink API (Python Version). For anyone who specifically wants to use Perl scripting on Linux, continue reading below; for people who prefer Python (or who don’t care about the scripting language) or who want to run on Windows, the new page will suit you better.
Introduction
I’ve been getting quite a few questions about my use of the NIBE Uplink API for monitoring my NIBE heat pump installation so this Page is a simple HOWTO guide for using a Perl script running on Linux to grab data via the NIBE Uplink API.
Disclaimer
This procedure works for me and I’m publishing it here as a Proof of Concept in case it helps other people trying to accomplish the same objective. It may not work for you. It may not get updated in line with changes to the NIBE Uplink API service. You are responsible for complying with the terms of the NIBE Uplink API Services Agreement and for keeping the application Identifier, Secret and any generated user Tokens confidential.
As with all other material on this Blog this article is published under the terms of the Creative Commons Attribution-ShareAlike 4.0 International License
My Use Case
I have an 8kW NIBE F1145 Ground Source Heat Pump which is configured to send data to the NIBE Uplink service over the Internet. The uploaded data is accessible via the NIBE Uplink website and via the NIBE Uplink smartphone apps, but those apps use the API under the covers and it’s possible to call the API directly from a custom program or script to access all the same data – and then do more interesting things with it.
I have written a script which is called on a timed schedule (every 5 minutes) to download the parameters I’m interested in which I then re-publish using MQTT (my personal preference; in no sense essential) to integrate them with temperature data from other sources (Dallas Semiconductor One-Wire sensors and Oregon Scientific temperature / humidity sensors – see other pages on this Blog for more details of those if you’re interested). Everything then gets loaded into an InfluxDB time-series database from which it can be extracted and graphed with Grafana (again my personal preferences but they work well for me).
An example of the sort of dashboard generated by Grafana is shown below but to be honest a static screenshot doesn’t do it justice since hovering over any of the graphs displays the numeric data values and clicking on one or more of the labels in a legend shows just those lines (and auto-scales to suit). Scrolling left and right across different time periods and zooming in and out is also easy and slick.
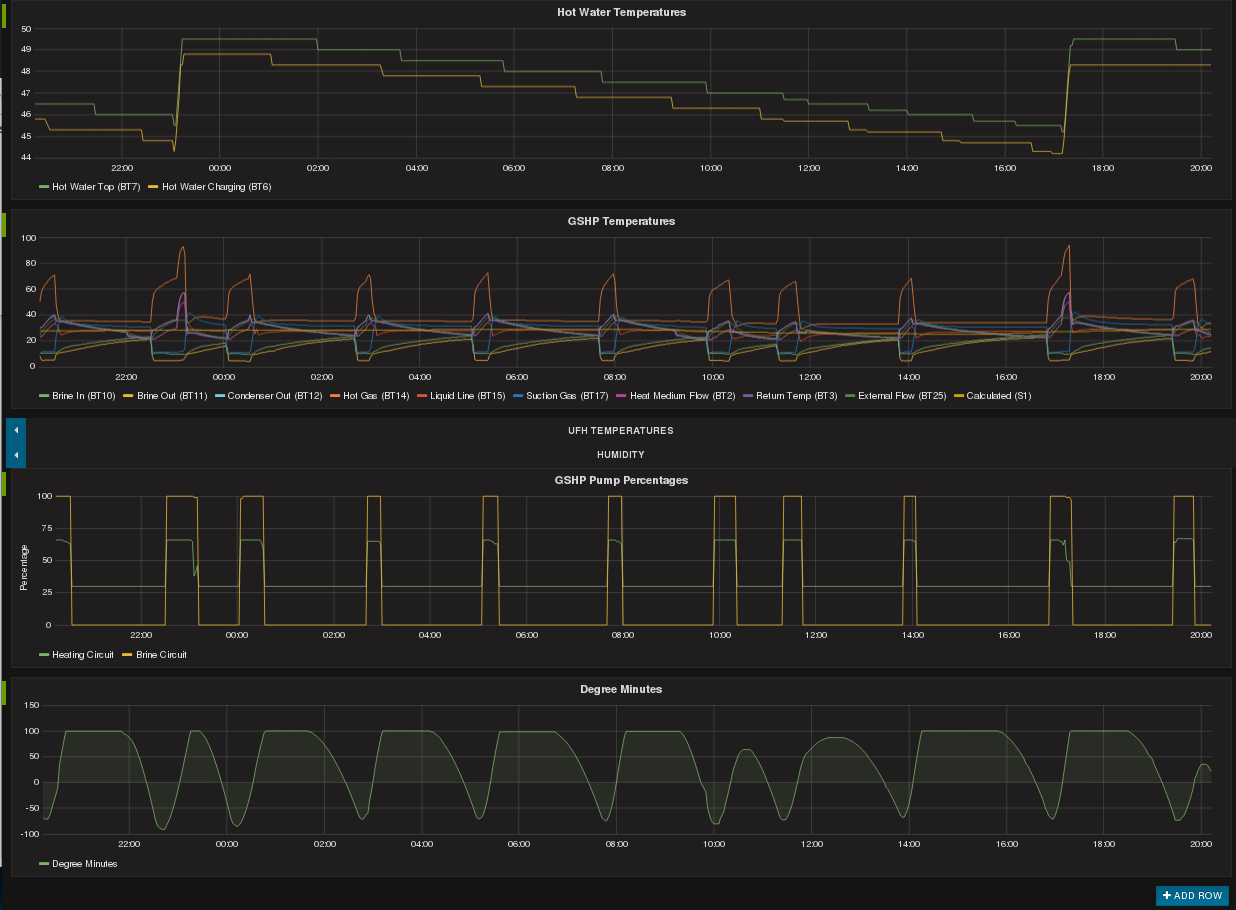
NIBE Heat Pump Dashboard using data extracted via the NIBE Uplink API
Pre-Requisites
At a bare minimum you will need the following to use this procedure:
- A NIBE Uplink account with at least one heat pump registered to it and reporting data which is viewable via the website or one of the smartphone apps.
- Anyone can use the “Register an account” button on the main NIBE Uplink page to create an account if you don’t have one, but unless you have a heat pump linked to the account the API won’t return any data.
- A Linux computer which is able to access the Internet and which will run the Perl script to download data via the API.
- It doesn’t need to be particularly powerful – a Raspberry Pi or similar single-board-computer would be adequate. It could also be a small Virtual Server (tested successfully with a Microsoft Azure Public Cloud ‘Basic_A1’ size of virtual server).
- It doesn’t need to run a web browser or have a graphical display attached – remote access via a terminal window using a tool like PuTTY or ‘ssh’ is sufficient.
- Since this Page is about the NIBE Uplink API and not about installing or configuring Linux or Perl, I’m going to declare that you should use a Linux distribution which has the Perl LWP::Authen::OAuth2 Module available as a standard operating system Package. This is true of Ubuntu Server 16.10, for example (where the package is called ‘liblwp-authen-oauth2-perl’).
- If you are familiar with Linux and Perl then go ahead and grab the source code for LWP::Authen::OAuth2 and install it on a Linux distribution of your choosing. I have it working fine on Raspbian Jessie Lite on a Raspberry Pi Model B, but I’m not going to document the somewhat lengthy procedure required to achieve that.
- An Internet-connected computer with a standard graphical web browser (Firefox, Internet Explorer, Safari etc.) which can be used to complete Steps 1 and 2 in the procedure described below. This can be any platform you like – potentially even a Smartphone – and certainly could be the same Linux computer described at Item 2 above if that meets the requirements, though typically it will be a different machine.
- If the computer running the browser is not the same as the one running the script, then ensure you can connect to the computer running the script, since you will need to copy-and-paste a long text string between the two, accurately and quickly.
- A basic knowledge of the Perl scripting language, editing files and installing software packages on Linux.
- I used Perl because that’s what I’m most familiar with and it has some add-on modules which help with much of the necessary processing. Alternatives such as PHP, Java or similar can probably be made to work too if that’s what you prefer.
NIBE Uplink API – Documentation and Underpinning Technologies
The official documentation for the NIBE Uplink API is at https://api.nibeuplink.com/docs/v1 (note you need to login to access that page). The detail is described on those pages but in summary:
- It’s a RESTful API accessed over HTTPS
- Data is encoded using JSON
- All requests are authenticated using OAuth2
- This presents the single biggest challenge because you need to obtain a valid Token and then Refresh that whenever it Expires
Personally I found the biggest barrier to getting the API working was understanding what the OAuth2 Callback URL was all about and what would be an acceptable value to use for that (there are several constraints). Actually it’s not all that complicated and it only needs to be used once, in order to initially get an Access Token. Importantly, it’s possible to run some steps in the procedure on different machines (as long as they’re done in quick succession). Here’s a summary of how it works:
- When one of your application’s users (most likely yourself in this scenario) enters their NIBE Uplink credentials in a browser window and agrees to grant your application access to their data, the NIBE Uplink website redirects them to the Callback URL, attaching an Authorization Code which is only valid for a limited time and can only be presented once
- Before the code expires, it’s necessary to present it to the NIBE Uplink Token URL together with other application-specific parameters in order to be allocated an Access Token and an accompanying Refresh Token
- As long as you can get the Authentication Code presented to the Token URL before it expires, you can do that from anywhere – it doesn’t need to be from the same machine as is hosting the Callback URL though that is typically the scenario described in other OAuth2 documentation
I believe it’s necessary for the Callback URL to use HTTPS and since that can be problematic to configure I’m hosting a simple script on the same server as this Blog which anyone should be able to specify as their Callback URL – it will simply print out the generated Authorization Code (or any error message). That URL is: https://www.marshflattsfarm.org.uk/nibeuplink/oauth2callback/index.php
(I’m going to assume the nice people at NIBE Uplink will permit multiple applications to be registered which have the same Callback URL.)
If you want to host your own installation of the Callback URL the PHP script code I’m using is as follows:
<?
// oauth2callback/index.php

echo "https://www.marshflattsfarm.org.uk/nibeuplink/oauth2callback/index.php ";
echo "OAuth2 Callback Script<br>";

if ( isset( $_GET['code'] ) ) {
    echo "Parameter 'code' found, value is: ";
    $code = $_GET['code'];
    echo "$code<br>";
} else {
    echo "Parameter 'code' not found<br>";
}

if ( isset( $_GET['state'] ) ) {
    echo "Parameter 'state' found, value is: ";
    $state = $_GET['state'];
    echo "$state<br>";
}

if ( isset( $_GET['error'] ) ) {
    $error = $_GET['error'];
    echo $error;
}

?>
The Perl module LWP::Authen::OAuth2 is used to hide a lot of the complexity of OAuth2. There’s a good documentation page for that at http://search.cpan.org/dist/LWP-Authen-OAuth2/lib/LWP/Authen/OAuth2/Overview.pod though in principle if you exactly follow the procedure outlined below you don’t need to understand how it works.
Step-By-Step Procedure
Step 0 – Prepare the Linux Computer
The computer which will run the script that calls the NIBE Uplink API needs some preparation to ensure the necessary supporting Perl modules are available. The following assumes it is running Ubuntu Server (or Desktop) 16.10, for the reasons described above.
- First ensure the Perl software is installed and check the location of the ‘perl’ executable:
$ which perl
/usr/bin/perl
Amend the scripts below if for some reason this is not as shown.
- It’s unlikely the LWP::Authen::OAuth2 Perl Module is already present so proceed to install that, using the following command (which will automatically install all required dependencies or will do nothing if it is already installed):
$ sudo apt-get install liblwp-authen-oauth2-perl
Step 1 – Register your Application
Start by Registering the new Application you will be creating at the NIBE Uplink website so that you get allocated your various unique ID strings which will be required later.
- Connect to https://api.nibeuplink.com/ using your favourite web browser on any machine you like (it does not need to be the machine which will later run the Perl script)
- Login with your NIBE Uplink username and password
- Click on the MY APPLICATIONS tab
- Press the Create application button
- Populate the Name, Description and Callback URL fields – choose your own values for Name and Description and either specify your own Callback URL (if you’ve set one up) or use https://www.marshflattsfarm.org.uk/nibeuplink/oauth2callback/index.php
- Read the Services Agreement, click to confirm your acceptance of that and then press the Create Application button
- Record the allocated Identifier and Secret strings and keep them secret!
Step 2 – Get an Authorization Code
Next, use your Identifier at the NIBE Uplink Authorize Endpoint to get an Authorization Code which relates to your usage (as an end-user) of your application (as a developer).
- Compose a URL in your browser’s address field by substituting your own value for [Identifier] (as just allocated) in the following URL template:
https://api.nibeuplink.com/oauth/authorize?response_type=code&client_id=[Identifier]&scope=READSYSTEM&redirect_uri=https://www.marshflattsfarm.org.uk/nibeuplink/oauth2callback/index.php&state=STATE- If you’re using your own Callback URL (redirect_uri) substitute that too
- The state should really be a random string that only you know and can verify when you see the same string returned, but hard-coding that as the fixed string ‘STATE’ doesn’t hurt for now. The state parameter does appear to be mandatory for NIBE Uplink API calls.
- Hit enter to navigate to the edited URL
- Assuming you’re already logged in to the NIBE Uplink API website (e.g. having just created your Application) in the same Browser you won’t be prompted for your credentials, otherwise expect to have to enter your Username and Password
- Expect to see a page like the screenshot below (you’ll see the Name you specified rather than “Simple API Script”)
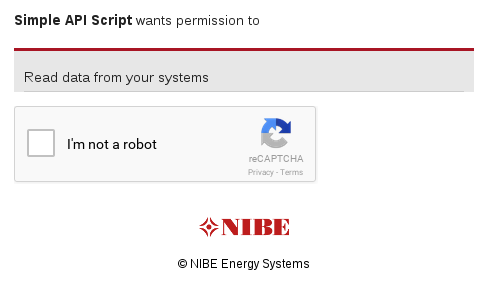
- Convince reCAPTCHA that you’re not a robot then press the Accept button
- If everything works you’ll see a very simple web page which looks like the following

- That value for Parameter ‘code’ (pixelized in the screenshot) is your Authorization Code which you’ll need to copy-and-paste at Step 3 – before it expires. Most likely you’ll need to re-run this step to get a new code once you’ve prepared Step 3.
Step 3 – Convert the Authorization Code to an Access Token
Switching now to the Linux computer which will be running your script, you need to create a Perl script which will use the Authorization Code in conjunction with other details (in particular the Identifier and Secret allocated previously) to request an Access Token which can then actually be used when calling the NIBE Uplink API.
- Use your favourite text editor to create a file called request_tokens.pl containing the following text:
#!/usr/bin/perl use strict; use warnings; use LWP::Authen::OAuth2; our $filename = $ENV{ "HOME" }.'/.NIBE_Uplink_API_Tokens.json'; sub save_tokens { my $token_string = shift; open( my $fh, '>', $filename ); print $fh $token_string; close $fh; } my $oauth2 = LWP::Authen::OAuth2->new( client_id => '[Identifier]', client_secret => '[Secret]', token_endpoint => 'https://api.nibeuplink.com/oauth/token', redirect_uri => 'https://www.marshflattsfarm.org.uk/nibeuplink/oauth2callback/index.php', request_required_params => [ 'redirect_uri', 'state', 'scope', 'grant_type', 'client_id', 'client_secret', 'code' ], scope => 'READSYSTEM', save_tokens => \&save_tokens ); print "Create a new Authorization Code and enter (copy-and-paste) it here\n"; my $code = <STDIN>; chomp $code; $oauth2->request_tokens( code => $code, state => 'STATE' ); exit; - Replace the bold strings in square brackets with your own values – retain the single quotes but replace the rest of the text, including the brackets. For example if your Identifier is XYZ, the line should read:
client_id => 'XYZ',
- Change the file permissions so the script is ‘executable’ by the owning user:
$ chmod u+x request_tokens.pl
- Run the script:
$ ./request_tokens.pl
and enter a newly-created Authorization Code when prompted (i.e. repeat Step 2 so you have a new Authorization Code to enter)
- If everything worked perfectly you will see no output text and you will find you have a new dot-file in your Home Directory called “.NIBE_Uplink_API_Tokens.json” containing the Access Token and an accompanying Refresh Token, serialized using JSON syntax. Note that it typically takes several seconds for the Tokens to be issued – the same delay is evident when using the Smartphone apps.
- Protect the contents of the token file with the same care you would a password or SSH Private Key. Make sure it is only readable by the owning user:
$ chmod 600 ~/.NIBE_Uplink_API_Tokens.json
- If instead you see a one-line error message like:
OAuth2 error: invalid_request at ./request_tokens.pl line 30.
then the NIBE Uplink system objected to your request for some reason – typically because the Authorization Code had expired or had been presented more than once – so check the input and try again
- If you see a lot more error text referring to an Internal Server Error then that’s the NIBE Uplink system responding to an unexpected error – check the Perl script matches the example above and try again
Step 4 – Call the NIBE Uplink API
Now we have an Access Token we can actually call the API, and now things are less time-critical because the Token will be automatically renewed as required.
- Use your favourite text editor to create a file called nibe_uplink_api.pl containing the following text:
#!/usr/bin/perl

use strict;
use warnings;
use JSON;
use LWP::Authen::OAuth2;

# File-scope variables, available to Main Program and Subroutines
our $filename = $ENV{ "HOME" }.'/.NIBE_Uplink_API_Tokens.json';

# Subroutine to save Access and Refresh tokens when those change
sub save_tokens {
    my $token_string = shift;
    open( my $fh, '>', $filename );
    print $fh $token_string;
    close $fh;
}
# Main Program

# Local variables
my $token_string;
my $url;
my $response;
my $decoded;

# Read saved token_string from file
open( my $fh, '<', $filename )
    or die "Could not open file $filename: $!";
$token_string = <$fh>;
chomp $token_string;
close( $fh );

# Construct the OAuth2 object
my $oauth2 = LWP::Authen::OAuth2->new(
    client_id => '[Identifier]',
    client_secret => '[Secret]',
    token_endpoint => 'https://api.nibeuplink.com/oauth/token',
    redirect_uri => 'https://www.marshflattsfarm.org.uk/nibeuplink/oauth2callback/index.php',
    request_required_params => [ 'redirect_uri', 'state', 'scope', 'grant_type', 'client_id', 'client_secret', 'code' ],
    scope => 'READSYSTEM',
    token_string => $token_string,
    save_tokens => \&save_tokens
);

# Make a simple NIBE Uplink API call - Get the Systems for this Account
$url = "https://api.nibeuplink.com/api/v1/systems";
$response = $oauth2->get( $url );
if ( $response->is_error ) { print $response->error_as_HTML }
if ( $response->is_success ) {
    $decoded = decode_json( $response->content );
    # Expect $decoded to be a Reference to a Hash
    my $objects = $decoded->{ 'objects' };
    # Expect $objects to be a Reference to an Array of Hashes
    for my $hashref ( @ { $objects } ) {
        my $system = $hashref->{ 'systemId' };
        print "systemId = ".$system."\n";
    }
}

exit;
That simple line $response = $oauth2->get( $url ); is doing most of the work here. Under the covers it’s taking care of presenting the Access Token when making the API call, checking whether the Token has expired and automatically renewing it if necessary. Whenever it gets renewed the new Token gets written back to the .json file so it is available for next time.
- Change the file permissions so the script is ‘executable’ by the owning user:
$ chmod u+x nibe_uplink_api.pl
- Run the script:
$ ./nibe_uplink_api.pl
If it works as expected it should list out the systemId number(s) of the heat pump(s) assigned to your NIBE Uplink account
JSON Response Formats
Some people have asked for examples of the JSON strings that are returned in response to the NIBE Uplink API calls. I’ve replaced strings like the serial number of my heat pump and my postal address details with XXXXXX’s but otherwise the responses are exactly as returned.
- In response to API call https://api.nibeuplink.com/api/v1/systems
{"page":1,"itemsPerPage":30,"numItems":1,"objects":[{"systemId":XXXXX,"name":"F1145-8, 1x230","productName":"NIBE F1145","productImage":{"name":"NIBE_F1145","sizes":[{"width":75,"height":100,"url":"/Content/Products/F1145_75x100.png"}]},"securityLevel":"ADMIN","serialNumber":"XXXXXXXXXXXXXX","lastActivityDate":"2017-04-17T14:12:41Z","connectionStatus":"ONLINE","address":{"addressLine1":"XXXXXXXXXXXXXXXXX","addressLine2":"XXXXXXXXXX","postalCode":"XXXXXXXX","city":"XXXXX","region":"XXXXXXXXXX","country":"UNITED_KINGDOM"},"hasAlarmed":false}]}
- In response to API call https://api.nibeuplink.com/api/v1/systems/$system/serviceinfo/categories (with $system replaced with the value returned for systemId previously)
[{"categoryId":"STATUS","name":"status","parameters":null},{"categoryId":"CPR_INFO_EP15","name":"compressor module ","parameters":null},{"categoryId":"SYSTEM_1","name":"climate system 1","parameters":null},{"categoryId":"ADDITION","name":"addition","parameters":null},{"categoryId":"AUX_IN_OUT","name":"soft in/outputs","parameters":null},{"categoryId":"SYSTEM_INFO","name":"info","parameters":null}]
- In response to API call https://api.nibeuplink.com/api/v1/systems/$system/serviceinfo/categories/status?categoryId=STATUS (with $system replaced with the value returned for systemId previously)
[{"parameterId":40004,"name":"40004","title":"outdoor temp.","designation":"BT1","unit":"°C","displayValue":"9.8°C","rawValue":98},{"parameterId":40067,"name":"40067","title":"avg. outdoor temp","designation":"BT1","unit":"°C","displayValue":"8.3°C","rawValue":83},{"parameterId":40013,"name":"40013","title":"hot water top","designation":"BT7","unit":"°C","displayValue":"41.4°C","rawValue":414},{"parameterId":40014,"name":"40014","title":"hot water charging","designation":"BT6","unit":"°C","displayValue":"37.9°C","rawValue":379},{"parameterId":43005,"name":"43005","title":"degree minutes","designation":"","unit":"DM","displayValue":"-57DM","rawValue":-578}]
Next Steps
If this procedure works for you, great! Please leave a Comment to let me know. If it doesn’t work or doesn’t makes sense please also leave a Comment and I’ll try to help.
Clearly just printing out the systemIds isn’t very interesting but the NIBE Uplink API Documentation describes the other API calls in some detail.
A slightly sanitized version of the script I actually use can be downloaded from here. Note it has dependencies on further Perl modules and won’t work without other pre-requisites being satisfied. However, it does provide examples of calling some of the other NIBE Uplink APIs and how to extract the details from the slightly convoluted nested data structures.
Further Reading
I found the following resources useful for understanding how to get OAuth2 working:
![]() NIBE Heat Pump Monitoring via NIBE Uplink API (Perl Version) by Marsh Flatts Farm Self Build Diary is licensed under a Creative Commons Attribution-ShareAlike 4.0 International License.
NIBE Heat Pump Monitoring via NIBE Uplink API (Perl Version) by Marsh Flatts Farm Self Build Diary is licensed under a Creative Commons Attribution-ShareAlike 4.0 International License.
Great Article thanks for sharing. Can you also share the PHP code for the Callback (https://www.marshflattsfarm.org.uk/nibeuplink/oauth2callback/index.php)?
Thanks J.
Thanks for the feedback; I *knew* there was something else I had meant to add to the article but I’d forgotten it was to do exactly that.
PHP script source now added to the body of the article.
David
Awesome Thanks David.
Hi!
First of all, nice work, very interesting and I have learned a lot from it.
Unfortunately I have not yet any Nibe geothermal heat pump, but plan to buy one.
I’m trying to do the very same as you but in my case I will use Java.
So my question is, if it will be possible for you to just send me some info. about the actual JSON respons that you use in your script. If I do have the JSON syntax will it be possible for me to do some coding before I have my very own pump and regarding to that also access to my own account. I see that you have an F1145, I’m quit not sure yet which model that will be the best for me, but I assume that they have similar syntax regarding JSON-respons.
Thank’s in advance!
Regards Örjan
For the record, I’ve exchanged a few emails with Örjan and discovered they’re planning to develop a NIBE heat pump binding for the OpenHAB home automation framework, which I also use.
There’s a discussion thread on the OpenHAB forum: https://community.openhab.org/t/nibe-uplink-binding/25756
I’ve also added some JSON Response Formats examples within the body of this Page.
Just to fill in with another work going on if more people find think link when searching for NIBE API, which I did =).
There is now a working custom component to http://www.homeassistant.io that was done by elupus (https://github.com/elupus) that works great! Everything you get from NIBEs App you can now see in your Home Assistant setup.
You can get the info here:
https://github.com/elupus/hass_nibe
https://community.home-assistant.io/t/nibe-uplink-api-component/18173
Hi,
we need to know if we need to pay yearly fee for using the API and NIBE Uplink.
Thanks,
Michele
Hi Michele,
No, there is no yearly fee. You just need to register an account, for free.
Yearly fees only apply if you want to Manage the heat pump remotely (e.g. to change the temperature settings) or to access History (i.e. old data) via the NIBE Uplink website. By storing the data in my own database I can use that to access old data.
David
Hi,
I was just reading your piece on using the Immersun system with your Mibe F1145 heat pump.
I have the same heat pump and wish to ista an Immersun system to divert my solar power energy to the immersion for free hot water, however I have just contacted Nibe who advise that I can not use an Immersun to that heat pump.
Do you have any info on how you connected yours and hows it working now?
Hi Scott,
So yes, I have a NIBE F1145 and yes, I have an ImmerSUN unit – but they’re separate. The immersion heater for the ImmerSUN is part of my 200 litre hot water storage cylinder.
There is another immersion heater which is incorporated into the F1145 but that is not connected to the ImmerSUN unit. I don’t believe there’s any way to connect or control that separately, which matches what you’ve been told by NIBE.
My F1145 and my ImmerSUN work well together because the immersion heater (in the hot water cylinder) has its thermostat set to 60 degrees. Normally that takes care of all the hot water. Only when the stored hot water is cooler than 50 degrees at 05:00 does the F1145 kick it and heat the water.
David
Many thanks for taking the time to reply David.
That is one of my biggest regrets with the system. Going for the all in one box limits what you other energy sources you can feed in. That being said, we are spending about half the price of oil heating the tank for a family of 4.
Hello, thanks for you tutorial
finaly i could make it to run.
do you have ever heart of iobroker? i would like to get the parameters of the nibe into the iobroker. do you now someone or can you maybe help me witth my problem? both run on the same raspberryPi.
thanks
Markus from Germany
Hey David,
First of all, thanks for the sharing of information – really useful! Could you elaborate on the reCaptcha / Authorization code portion and how you handle it in your environment? Do i inturpret you correctly where you basically obtain the code once, then always use the token from that part on? I am developing an UWP/C# (not always turned on – as in IOT scenarios) app running in a “kiosk” scenario – where restarts would have to be handled, prolonged over the 1800 seconds the token lasts – making it hard to “authorize” the app / user each time the applicatio is fired? Thanks in adnvance!
Hi Lars,
Authorization is a one-time thing. There are effectively 2 separate tokens issued at the time of the initial Authorization: one “current” token and another “renewal” token. The latter can be used to renew the “current” token whenever that expires. I don’t envisage any particular problem with your use case since it matches what I’m doing and I only had to do the manual Authorization once.
It sounds like you’re likely to find that the “current” token will have expired whenever you come to re-use it, but you can just use the “renewal” token to get a new one. That aspect of the processing is taken care of by the Perl library I’m using so it’s not something I had ot code for myself.
David
Did you try to set parameters via API? and if so would you be willing to share your code?
No, only reading data. I’ve not tried setting / changing any parameters.
David
Hi,
First of all nice work done. I am working on virtual machince (linux Ubuntu) and I am getting error:
“While decoding token-string: ‘ ” ‘ expected, at character offset 20 (before “(end of a string)”) at /path to the Oauth2.pm file/ line 306
Why am i getting this error?
Hello,
Great article, thanks a lot.
I went sucessfully up to end of the step 4 getting systemId of my heatpump.
But I’m suffering now how to use your examples of API calls. Do I need to integrate them into nibe_uplink_api.pl script, please sugest.
Secondly I want to test another version of the script shared by author but I’m having issues how to install AnyEvent::MQTT and AnyEvent::DateTime::Cron under openhabian running on rasberrypi4.
Thanks in advance for any sugestions.
Leszek
output:
[14:30:59] openhabian@openhab:/$ sudo apt-get install libanyevent-datetime-cron-perl
[sudo] password for openhabian:
Reading package lists… Done
Building dependency tree
Reading state information… Done
E: Unable to locate package libanyevent-datetime-cron-perl
[14:33:03] openhabian@openhab:/$ sudo apt-get install anyevent-mqtt-perl
Reading package lists… Done
Building dependency tree
Reading state information… Done
E: Unable to locate package anyevent-mqtt-perl
Hi, Issues above already solved. 😉
Pleased to hear you got things working.
David
hi, do you know anything supporting to windows environment?
There is a Perl distribution for Windows – take a look at https://www.activestate.com/products/perl/
Alternatively it should be possible to replicate the logic using a different scripting language but I don’t do coding on Windows so not familiar with the options.
David
Hi David,
Thanks for that.
My address fields also came back blank.
Patrick
Hi,
How do I get the address to output.
I tried to use:
my $system = $hashref->{ ‘address’ };
But I just get a HASH result.
Hi Patrick,
Since ‘address’ isn’t a single value but rather a group of fields (addressLine1, addressLine2 etc.) it comes back as a Reference to a Hash, from which you then need to extract the various fields. Something like this:
…
# Expect $objects to be a Reference to an Array of Hashes
for my $hashref ( @ { $objects } ) {
my $system = $hashref->{ ‘systemId’ };
my $address = $hashref->{ ‘address’ };
# Expect $address to be a Reference to a Hash
my $country = $address->{ ‘country’ };
print “$country\n”;
}
…
I’m finding that the address details are not populated in the response to the initial API call to https://api.nibeuplink.com/api/v1/systems – most of the address fields come back as ‘null’. I haven’t checked but presumably when you call the API to get info on a specific SystemID they are populated then.
David
Hi David,
Thanks for that.
My address fields also came back blank.
Patrick
Hello,
How can Is et parameters like 47015 using their PUT function. When I use it it will always give me an error.{
“httpStatusCode”: 400,
“errorCode”: 1,
“timestamp”: “2020-06-07T06:42:01.8542968Z”,
“details”: [
“Error 14: 47015”
],
“data”: null
}
Please help me.
Thanks
Hi Ruvini,
I’ve only tried Reading the parameters with an HTTP GET, not Writing them with an HTTP PUT – but it ought to work since it’s part of the documented API set.
One reason I haven’t tried is that I know I don’t pay for the Premium Service that lets you make adjustments remotely, via the App. Are you paying for that and can you use the App to make the same adjustments?
From a quick look at the API docs it seems you need to Authenticate with the “WRITESYSTEM” scope rather than the “READSYSTEM” scope, in order to call the PUT APIs. Are you doing that successfully?
I don’t see 47015 listed as a Parameter in the API docs. What are you expecting that to adjust?
Regards,
David
Hi David,
I can set the parameters listed in their documentation.I’m using WriteSystem. But I need to set 47015 which is “Min Supply System 1” temperature . But seems this cannot be set from PUT function.
Thanks,
Ruvini
Hi Ruvini,
If you’re able to change other settings using PUT but not 47015 then you’ve clearly made much more progress than I had and I can only presume that for some reason that parameter is not supported by the API at this time. Probably something for you to take up with the NIBE API folks.
Regards,
David
Hi, This is very interesting because I have been trying to pull down parameters with groovy in samsung smart things. The concepts are the same however Nibe are very unhelpful when there are issues. The documentation is also very poor as many of the 4XXXX parameters are not documented.
In the debug code output below I am getting zero for parameter 43084 which is power draw related. Other parameters and their values are coming back fine. Has anyone tried monitoring the power consumption of the unit successfully?
Best Regards,
Adiran
resp data: [[designation:BT50, displayValue:20.6°C, name:40033, parameterId:40033, rawValue:206, title:room temperature, unit:°C], [designation:BT1, displayValue:16.7°C, name:40004, parameterId:40004, rawValue:167, title:outdoor temp., unit:°C], [designation:BT7, displayValue:50.7°C, name:40013, parameterId:40013, rawValue:507, title:hot water top, unit:°C], [designation:, displayValue:–, name:10001, parameterId:10001, rawValue:-32768, title:fan speed, unit:%], [designation:, displayValue:0.0kW, name:43084, parameterId:43084, rawValue:0, title:electrical addition power, unit:kW], [designation:, displayValue:–, name:43066, parameterId:43066, rawValue:-32768, title:defrosting time, unit:s]]
Hi Adrian,
IIRC “electrical addition power” is for the last-resort resistive heater which ideally never gets used.
I’m not aware of any means of measuring the electrical power consumption without an electrical sub-meter on the supply to the unit. Some of the NIBE units have an input for the pulse-output from such a meter – more info at https://www.nibe.eu/en-gb/products/energy-meter – in which case I’d expect the info to be available via the API.
David
Hi David,
Thanks for the excellent article! Trying to setup Nibe API for monitoring, but I’m stuck at step 3, getting error:
OAuth2 error: invalid_client at ./request_tokens.pl line 30
If I deliberately give a wrong authorization code, I’ll get a different error (namely “invalid_request”), so I’m pretty sure code is correct. I’ve also double checked client_id and client_secret. Any ideas how to troubleshoot this further? Or to get more verbose error message?
I’m using Debian 9 with perl v5.24.1,and liblwp-authen-oauth2-perl version is 0.13-1. Also using my own callback url.
Hi Tunnus,
It’s now feeling like a long time since I set this up and wrote the article so it might take me a while to get back up to speed with how this all works. My script calling the API is (still) working fine but setting up the authentication was a one-time thing a while back…
I’m not sure how to get more verbose debug output but it looks like “invalid_client” is a message coming back from the NIBE server so you’ll not get any more info by asking for extra debug at the client end.
My hunch is that your installation is using a default value NIBE doesn’t like – maybe for client_type? Some other reports of “invalid_client” for OAuth2 with other APIs indicate an issue with encoding or authentication. Maybe check the docs for OAuth2->new and try setting some extra parameters when calling that to override the defaults?
David
Late in the game, but following your instructions to the letter. When logging in to myuplink.com, I can see the heatpump I have. I go on to register the application in the api webpage, I can retrieve the access token and I can query the API – but the systems query returns no system?? No error, no complaints, simply no system. I added a printout of the json returned, and yes, no system, {“page”:1,”itemsPerPage”:30,”numItems”:0,”objects”:[]}
What could be the reason? If something went wrong, I would at least expect some error message??
johan
Same problem on my side, it seems that the S series are not yet supported.
Dear Marshflattsfarm,
I use the Domoticz software on a RaspbarryPi4. I have installed a Nibe Heatpump and connection with Nibeuplink API. When installing the Domoticz RPC for nibeuplink, with a call back URL https://www.marshflattsfarm…. I get a responce from Nibe: The callback URL ( https://www.marshflattsfarm.org.uk/nibeuplink/oauth2callback ) is not allowed for this client.
My question: is this due to restriction from your site (what are they) or is Nibe not prepared to use this call back url anymore?
Thanks a lot for your answer.
Harrie Beelen
Hi Harrie,
I had not tested the procedure documented on this page for a long time but just tried it now and it’s working OK. On that basis it l think NIBE are still happy with the callback URL.
Are you trying to follow the instructions at https://www.domoticz.com/forum/viewtopic.php?t=13996 and hitting the problem that the “showquerystring” URL documented there no longer works?
At which point do you get the error message you mentioned?
I’m not aware of any restrictions from my site that hosts the oauth2callback.
I wonder if the Domoticz script is using a different format for the Token file.
David
Hi David,
thanks a lot for your reply. The “not allowed message” is presented by Nibe. After sending the big URL (asking authorisation code and so on) and logging in on Nibe.
Now I made some progress:
First I made one Nibe application with your callback directory and everything is working fine. Very happy about it.
After that I made a new (test) application in Nibe with the same callback directory. Reason: I have made a test enviroment with another pi because I didn’t want to disturb my running/operational app with my testing.
When asking for the authorisation code, Nibe sents this not allowed message.
Running both with the same Identifier and secret code works fine. It looks very strange to me. What could be the reason? Do you have any suggestions?
Harrie
Hi Harrie,
As you say, this does seem strange. All I can suggest is double-checking that you are using the correct / aligned identifiers and secret strings for everything.
I forget whether there is some sort of ‘rate limiting’ on the NIBE API – if there is, that might cause them to reject multiple requests in a short period of time – in which case trying again after a few minutes might help.
David
I know that this is a quite old post; but I found it when looking for an implementation of the NIBE API in php.
So I just released a ready-to-use app on Github (https://github.com/olssonm/nibe-app) that is free to use and hackable. Also released an OAuth2-adapter if anyone want to build their own app from scratch (available here: https://github.com/olssonm/oauth2-nibe)
Anyhow, just wanted to drop by and say thanks, used your initial blog post as an inspiration when debugging the authorization flow. Thanks! =D
Hey, thank you so much for this post. It is very helpful.
Alas I am stuck at step 3 part 4-5.
I am able to launch the perl script succesfully. I pasted the authorisation code without any problem. The perl script ends. But I cannot find the NIBE .JSON file.
I have searched everywhere on my pi. (home, bin, usr,…)
Please help.
Hi Frederik,
The output filename is set in the Perl script – in the line that refers to $ENV{ “HOME” }.’/.NIBE_Uplink_API_Tokens.json’
In the Bash shell it should be accessible as $HOME/.NIBE_Uplink_API_Tokens.json for the user that runs the Perl script. If you’re not familiar with how Linux handles files with names like that, note that the leading ‘dot’ (.) means the file will not show up in a simple ‘ls’ command but it will be listed if you run ‘ls -a’.
Cool! I found the json with the ls -a command.
I am very new to linux.
I am just a simple architect trying to find the mysteries of programming.
Thanks a bunch!
Next step: trying to parse the data from my heatpump in python…a big step for me 😉
Hey thanks david, great post.
I am stuck with the creation of the JSON file
The perl script works fine and the auth code works. But I cannot seem to find the JSON file. How do I know it is on my pi?
Hey David
I am stuck again.
I am trying to tweak your code a bit in order to read the current temperature.
My ID is in ‘XXXXXX’ fot security reasons.
# Testfred
$url = “https://api.nibeuplink.com/api/v1/systems/xxxxxx/smarthome/thermostats”;
$response = $oauth2->get( $url );
if ( $response->is_error ) { print $response->error_as_HTML }
if ( $response->is_success ) {
$decoded = decode_json( $response->content );
# Expect $decoded to be a Reference to a Hash
my $objects = $decoded->{ ‘objects’ };
# Expect $objects to be a Reference to an Array of Hashes
for my $hashref ( @ { $objects } ) {
my $system = $hashref->{ ‘CurrentTemperature’ };
print “CurrentTemperature = “.$system.”\n”;
}
}
What is wrong in this part? I have no knowledge yet of Perl.
Hi Frederik,
It’s quite difficult to unpick the JSON data structures even when you know Perl so I found there’s quite a lot of trial-and-error required. Mostly it takes an understanding of what sort of JSON is coming back from a particular API function call.
In my example code at step 4.1, calling api/v1/systems, the documentation page for that (https://api.nibeuplink.com/docs/v1/Api/GET-api-v1-systems_page_itemsPerPage) gives an example of the JSON response text. My sample code is selecting the record named “objects” then – within that array (we know it’s an array because the JSON contains ‘[‘ and ‘]’ characters ) – selecting the record named “systemId”.
Now, based on you having changed the API function to api/v1/systems/{systemId}/smarthome/thermostats the JSON data structure that comes back will be significantly different (based on the documentation page for that API function). The top-level data structure is an Array, then there are records named “smartHomeSystem” which include records named “currentTemperature” (and not “CurrentTemperature”).
Does that help? The other thing I found useful was including Perl print statements to print out $decoded and variables like $objects – that will at least tell you what sort of Perl datatype they are.
Also print $response-> content to check that contains the data you’re looking to extract.
David
Hi Frederik,
Based on the documentation for the smarthome/thermostats API, try this code snippet:
# Expect $decoded to be a Reference to an Array of Hashes
for my $hashref ( @ { $decoded } ) {
my $system = $hashref->{ ‘smartHomeSystem’ };
my $systemname = $system->{ ‘name’ };
my $temperature = $hashref->{ ‘currentTemperature’ };
print $systemname.” “.$temperature.”\n”;
}
ok, i fixed the bugs and i got these errors:
Global symbol “$systemname” requires explicit package name (did you forget to declare “my $systemname”?) at ./nibe_uplink_api_2.pl line 59.
Global symbol “$temperature” requires explicit package name (did you forget to declare “my $temperature”?) at ./nibe_uplink_api_2.pl line 59.
Execution of ./nibe_uplink_api_2.pl aborted due to compilation errors.
I might be in the wrong url (api/v1/systems/{systemId}/smarthome/thermostats) as well, I just want to read data from my external temperature sensor delivered with the heat pump.
Hi!
Thanks for this great job! I’ve been looking for ages for a way to integrate my Nibe with Fibaro.
I hope you can help me on one thing though. When I run the script request_tokens I get the error message saying ” ‘authorization_endpoint’ is required, cannot be missing at ./request_tokens.pl line 16.”
Maybe I’ve messed up the perl installation (5.28) or the OAuth2 module installation (0.07)? Running Mac. Otherwise I’ve just added ID and secret as your instruction.
Thanks in advance!
As always, be sure that you have the right versions of all modules installed. Problem solved 🙂
Once again, big thanks for this!
Have you or do you know if this is possible to run on Fibaro Home Center 3, or any other smart-home system with same language(LUA?). And if so, if they have som code er steps on how-to to share?
Hi! Just wodering where you fetch the timestamps needed to map measure in graph from the api, like heat medium flow, return temp etc. Cannot see any timestamps I api? BR Sjo
Hi Sjo,
That’s a very good question. As you say, there are no timestamps returned from the APIs.
The documentation says the API calls return “current” values (actually from when they were last updated, a few minutes ago) so it’s OK to use the “current” time – since the values change quite slowly.
Personally I call the API every 2 minutes to grab the “current” readings then Publish those to MQTT. That step to “Publish” effectively picks up the current time, so when the events land in InfluxDB (via Telegraf, which Subscribes to MQTT) they have a timestamp, and can be graphed.
David
Hi,
Liked your article alot.
Tried to port it to Postman but no luck.
All parameters in the Oauth 2.0 are ok, i get the login to NIBE dialog but after the captcha i get:
Get new access token
Authentication failed
Couldn’t complete authentication. Check the Postman Console for more details.
Console says: Error: invalid_request
Very strange,
BR
/P
These instructions are old, but gold! I owe you a massive thanks, as I finally got my use case to work. Was really struggling with the authentication and tokens part, but thanks to you I got it to work.
I have a Høiax Connected water heater, and it’s using myuplink as well. So if anyone were to stumble upon this page with the same use case as myself, this setup works like a charm with some minor alterations in the code to cater for api.myuplink.com.
For the record, I use Node-Red to run the script and for pushing the data to MySQL, then I have Grafana to visualize it.
Thanks again!
There is a typo/missing space after code in ‘request_tokens.pl’ which results in getting back ‘invalid request’ from Nibe….
“code=> $code,” should be “code => $code,”
Thanks for the feedback Heyoe; now changed.
David