
By using non-vendor-managed firmware for the GL.iNet GL-S20 Thread Border Router, the Thread network is no longer limited to 3 or 4 devices and a few of the more minor annoyances with the standard firmware have been addressed:
- The new Web UI no longer constantly requires the Admin password to be entered. Now it doesn’t ever require any password – which could be considered a security risk, although that can be addressed by restricting access to the TCP/IP network it’s connected to.
- The Web UI now includes a Thread network Topology viewer which shows how the End Devices are connected to the Leader and any other Router nodes.
As a bonus, the TBR now supports Thread version 1.4 and it didn’t require the Thread network to be re-created following the installation of the new firmware; the previous details must have been saved in Non-Volatile Storage.
A very minor issue is that the wired network interface is using a very different MAC address and so is no longer matching the DHCP lease reservation assigned to the old one. Also, it was probably unreasonable to expect the Factory Rest button press to continue to restore the original factory firmware, so reverting to the GL.iNet-managed firmware would be more involved, perhaps most easily accomplished using the Windows firmware installation tool.
The source code for this alternative firmware comes from https://github.com/EPinci/ep-s20-otbr – where the ‘heavy lifting’ is done by links to the standard Espressif IoT Development Framework (IDF) and Thread Border Router (Thread-BR) SDK GitHub repositories. There’s then a fairly ‘thin’ add-on layer (based on some code previously released by GL.iNet) which is specific to the GL-S20 hardware.
The IDF runs perfectly happily on a Linux (Fedora) desktop which had no issues connecting over a USB cable to the USB-C port on the GL-S20. (The first installation of the alternative firmware must be done via a USB cable, although subsequent updates can be done over the network.)
The main issue I hit was a difference in the sizing of the Non-Volatile Storage (nvs) partition on the GL-S20: on my device this was previously sized at 0x10000 (ten thousand) bytes and by default the new firmware was mapping it as 0x6000 (six thousand) bytes, which triggered an error check for ‘no free pages’ (and a constant reboot cycle). Fortunately I’d saved a dump of the boot log when running the GL.iNet 2.0.1-B1 firmware which included the original partition table sizing, which I was then able to match with a small edit to partitions.csv. I added much more detail on this in Sizing of ‘nvs’ partition; ESP_ERR_NVS_NO_FREE_PAGES error (fixed) #1 in the Issues log on the GitHub repo.
The Thread Topology viewer is a feature that is almost essential for managing a Thread network with more than a very few nodes.
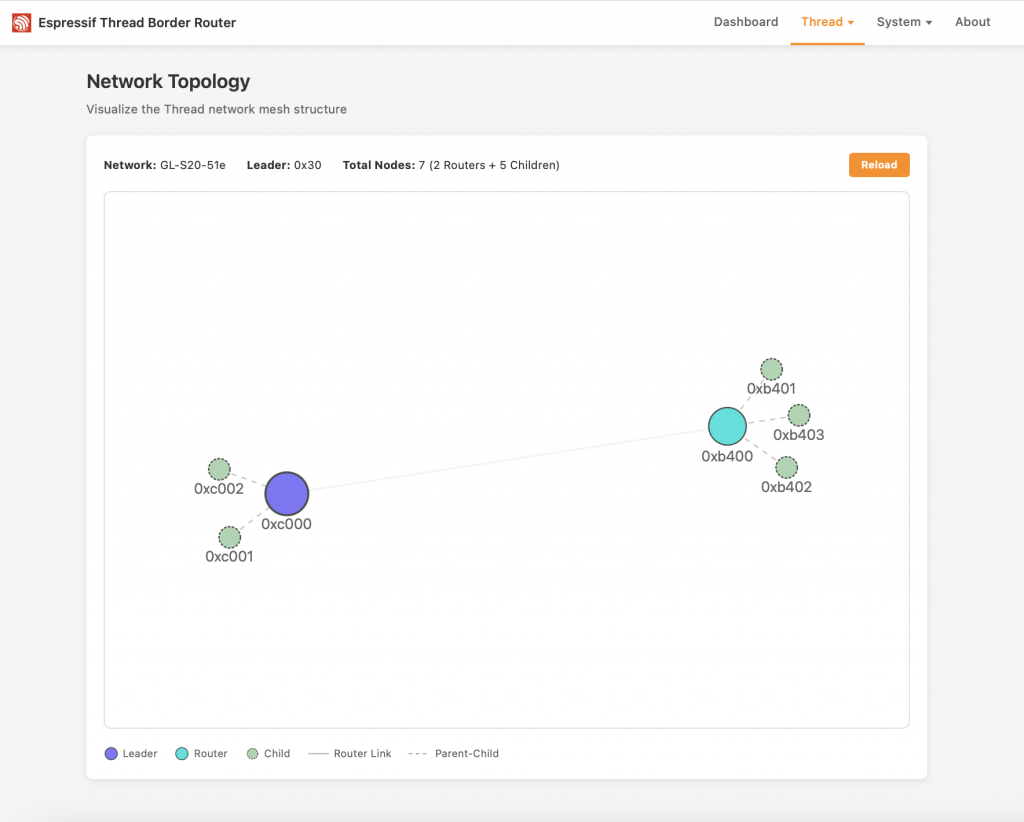
The example Topology view above shows the Thread network Leader (the GL-S20) in Blue, with one Router (an IKEA GRILLPLATS smart plug) in Cyan. The ‘Child’ (i.e. non-Router) devices are in Green.
This Topology view introduces a set of node identifiers I had not come across before; IDs like 0xb402 are Thread network Routing Locator (RLOC) identifiers – strictly speaking RLOC16 identifiers (since these are just the last 16 bits of the full RLOCs) which identify the placement of nodes within the Topology graph. It is implicit in the naming that Node 0xb402 is a Child of Router 0xb400. Clearly these identities must change as the Topology changes – which is why alternative identifiers are also in play.
As yet I’ve not tried Commissioning a new Matter-over-Thread device with the TBR running this alternative firmware, but given that all the Thread credentials appear to have been preserved there’s no reason why that shouldn’t work the same as before.