
There are some network Subnets which are local to the Outbuildings, with a Routed (Layer 3) connection back to the House.1 To field DHCP requests for Hosts on these Subnets, there needs to be something local to those subnets to receive the DHCP packets broadcast by clients.
Plan A was to use a separate instance of the dnsmasq DHCP / DNS server running on the Firewall / Router in the Outbuildings, configured with its own DHCP Ranges and Host Reservations etc. and forwarding DNS requests to dnsmasq running on the Firewall / Router in the House, While this sort-of worked OK, there were some shortcomings:
- Hosts in the Outbuildings can resolve DNS requests for Hosts in the House, since the House’s DNS server is ‘upstream’ – but Hosts in the House cannot resolve DNS requests for Hosts in the Outbuildings, since those DNS records are only present in the Outbuildings’ DNS server.
- While this isn’t a show-stopper, it’s more convenient for all Hosts to be able to resolve DNS names for all other Hosts.
- I guess a workaround would be to point all the Hosts in the House to the Outbuildings‘ DNS server – but that would be pretty clunky
- DNS responses from the House’s DNS server to the Outbuildings’ DNS server are flagged as a “possible DNS-rebind attack” – because they map to RFC1918 ‘private’ address space. The default configuration of
dnsmasqon OPNsense makes it difficult to process such requests; it’s difficult to turn off the checking for such attacks.
Plan B is therefore to run DHCP Relay agents on the Subnets in the Outbuildings instead, forwarding DHCP requests to and from dnsmasq in the House. As well as addressing the issues listed above, there are a few ‘softer’ benefits:
- All of the DHCP configuration – of Ranges, Host Reservations etc. is now consolidated in one place – in the House’s
dnsmasqconfiguration pages.- There’s just a small, one-time configuration required in the Outbuildings’ router configuration, for every Subnet that needs a DHCP Relay agent
- While this means there’s a single point of failure for DHCP, the House’s router is a single point of failure for pretty much all of the network connectivity anyway
- Since the House’s
dnsmasqserver is configured to set the DNS server record in DHCP leases to ‘the address of the DHCP server’, that has the side effect of having all DNS queries from the Outbuildings go direct to the House’s DNS server – without the need to run any sort of DNS relay in the Outbuildings.- The same applies for NTP
In order to implement this behaviour the DHCRelay Service needs to be configured on the Outbuildings’ Firewall / Router. (It’s installed by default but without any configuration entries it has no effect.) There needs to be one “Destination” DHCP server (the House DHCP server in this case) set up – and then every network Interface which needs DHCP Relay services needs to be aded to the list of Relays.

Then, on the House’s Router / Firewall, the corresponding DHCP ranges need to be defined as part of the dnsmasq configuration. All of the relayed DHCP requests for clients in the Outbuildings appear on the BACK network interface (the backbone link between the two routers) so the various address ranges need to be specified against that one interface.
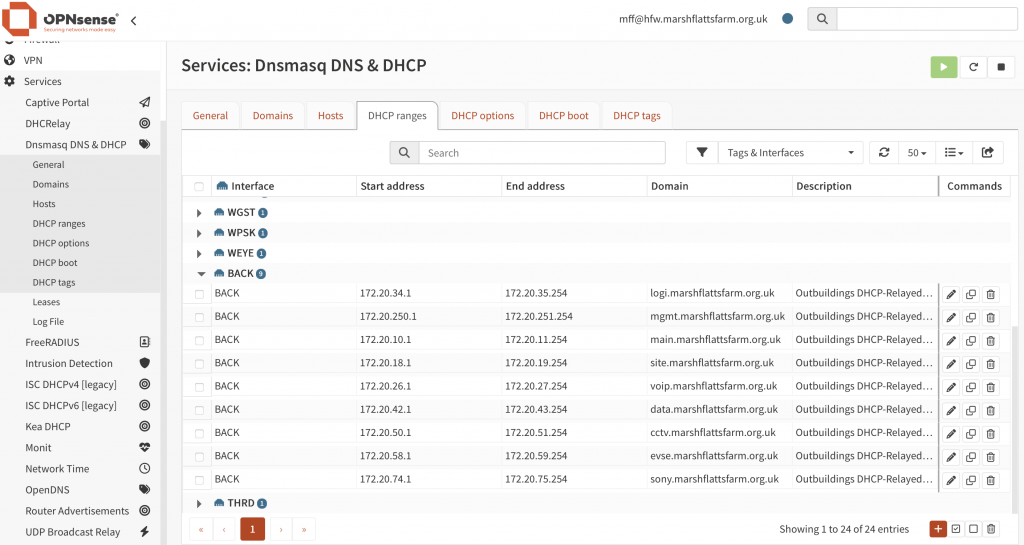
I think that’s all the configuration that is required. The relayed DHCP Request includes the IP address on which the Relay received the DHCPDISCOVER packet, which is enough to let the DHCP Server select from the appropriate address range (of the many ranges configured against the BACK interface).
- There are other network Subnets which need to be ‘stretched’ across both buildings. This is either because devices rely on Layer 2 continuity across the whole network (as is the case for the Paxton access control intercom system) or because they are supporting particular WiFi SSIDs and it needs to be possible for WiFi clients to roam from one Wireless Access Point to another while preserving the same IP address – even if these APs are in different buildings. All such networks are ‘bridged’ across the two buildings, so any DHCP traffic is naturally presented to the House DHCP server anyway. ↩︎