Rainwater Pipework Labelling

One risk with having two separate water pipework systems in a building, where one set of pipes carries Drinking Water supplied from the mains and the other set carries Rain Water, is that it’s important to ensure the right pipe is connected to the right appliances – especially when new connections are being added some time after the original pipework was installed. Accidentally connecting to the wrong pipe won’t be obvious since both pipes carry cold water, but Rain Water is not safe to drink (and must not be allowed into the water supply network).

In the Outbuildings (as opposed to the House) it helps that the pipework is exposed so it’s not too difficult to trace the pipes, but the regulations rightly specify that the rainwater pipework needs to be clearly labelled at suitable intervals.

It seemed sensible to label both sets of pipes, for extra clarity, and to follow the BS1710:2014 guidance for the label colour scheme. This uses Green as the background colour (to indicate a Water pipe) then various other coloured band(s) to indicate the type of water and the source. RM Labels offer a nice range of pipe labels and valve tags and I settled on:

  • For the Drinking Water pipes, their Drinking Water Pipe Marker PMW32a which has a Blue band, indicating “Potable water derived from the public water supply”
  • For the Rain Water pipes, their Rain Water Pipe Marker PMW59a which has a Grey band (to indicate a source other than the public water supply) and a Black stripe (to indicate the water is non-potable).

While it is of course necessary to follow the label colour standards and professional plumbers should be familiar with the colour codes, I’m not sure who else would know what the Grey, Black and Blue bands mean – but the text makes the pipe contents clear too.

“Rain Water” and “Drinking Water” pipe labels attached to insulated 22mm copper water pipes

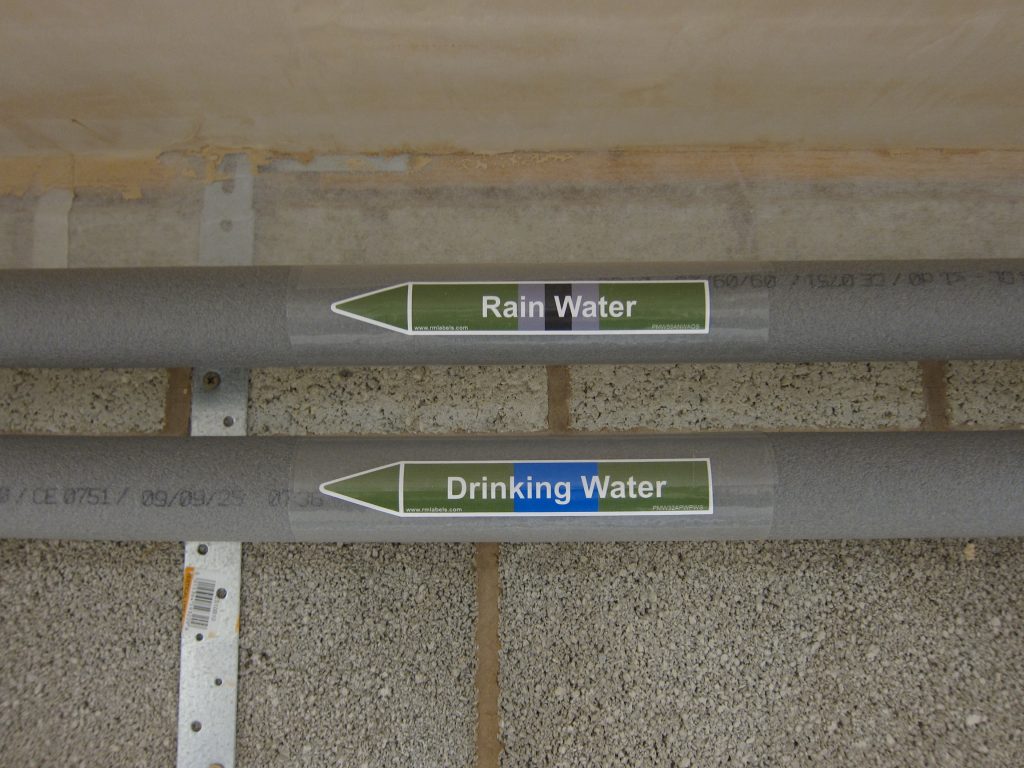
One minor problem is that these labels don’t stick very well to polythene pipe insulation – especially in cold and damp conditions – so I opted to over-wrap the labels with the sort of clear sticky film intended for wrapping paperback textbooks (visible as a shiny band in the photo). That film is cut long enough to wrap over onto itself, which should help it stay in place.

(An alternative would have been to use slightly different labels that are supplied on a roll and which wrap all around the pipe by themselves, e.g. Drinking Water Pipe Banding for Potable Water from Public Water Supply – Self-adhesive – PB001PWPWS and its equivalent for Rain Water.)

Outbuildings: 2026-01-22 Update

Outbuildings: 2026-01-22

While almost all of the building work was completed before the end of 2025, there were a few items outstanding which have been attended to over the past couple of days:

  • The rainwater drainage inspection chamber in the North-East corner of the Courtyard (top-left of the overview photo) has always been holding 30-40mm of water – implying an inadequate ‘fall’ on the outlet pipework.
    • The fall was checked with a laser level on Tuesday, which confirmed the chamber was set at the right level and pointed to some sort of issue on the downstream pipe run.
    • Excavation of that pipe run showed there was a ‘hump’ in the pipe which was causing the issue – partially due to it passing over a separate underground pipe connected to an Aco doorway drain.
    • With the pipe run re-routed away from the other pipe and re-levelled at the correct fall, the rain is now draining out of the inspection chamber.
  • The ground in the Courtyard has always been prone to holding pools of standing water – which was evident before construction started. As a consequence, a network of ‘land drain’ pipework was installed, formed from four ‘legs’ running east-West (which will end up in the middle of future planting beds).
    • The expectation was that there would at least be no standing water in the immediate vicinity of those land drains – but that wasn’t the case, and in fact there were some pools of water directly above the drains.
    • The issue turned out to be the use of solid clay as the back-fill material over the land drain pipes – and in some cases inadequate pea gravel over those pipes.
    • The agreement with the build team was that they would remove the layer of clay overlaying the land drains and top-up the pea gravel cover over the pipes to the specified 100mm depth – and then I will fill the trenches with some more free-draining soil from elsewhere on the site, as part of the work required to prepare the soil between the drains for planting.
  • Some other finishing touches that happened to be scheduled for today were for the windows and doors.
    • One of the window handles was from a faulty batch, and the lock cylinder kept falling out – so that handle was replaced (from a new, good batch).
    • There was some install-time damage to one of the door handles, which was also replaced.
    • The original window sills turned out to be too ‘deep’ to fit properly so those were re-made and fitted today.
    • A minor manufacturing defect on the bi-fold door meant the bottom seal had been torn – and would be torn again if one of the hinge fixings wasn’t adjusted, so that hinge was re-fitted and the seal replaced.