Validation of Passivhaus-Level Heating Performance

The main criterion for Passivhaus-level performance is achieving a space heating requirement better than 15 kWh per m2 of floor area per year (see e.g. this page from the Passivhaus Institut) when heating to an internal temperature of 20C.

One benefit of having a heating system listed on the Heatpump Monitor website is the Heatpump + Fabric dashboard, which orders systems by kWh/m2 and thus provides a direct view of whether buildings are performing at this level.

Screenshot of the “Heatpump + Fabric” dashboard on Heatpumpmonitor.org

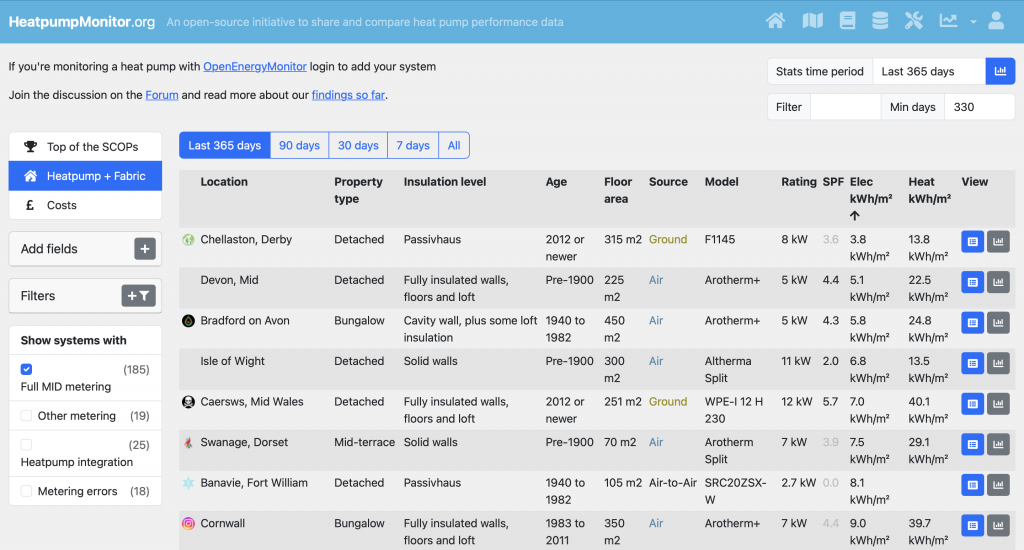
A few points to note:

  • By default, this list is sorted by Electricity Input (Elec kWh/m2) rather than Heat Output (Heat kWh/m2) but that’s easy to change.
  • It’s not obvious but the Elec and Heat figures relate to the Combined performance of the heat pump, when delivering Space Heating and also when heating Domestic Hot Water.
  • There is no indication of the internal temperature achieved, so some buildings might be hotter (or cooler) than the nominal 20C used for the Passivhaus assessment.

The second point tends to increase the consumption figure – potentially quite significantly, because high-performance buildings can use just as much DHW as low-performance buildings, and the higher temperatures required for stored hot water (compared with space heating) results in lower efficiency from a heat pump.

Some systems listed on heatpumpmonitor.org provide additional data on whether they are delivering Space Heating or Hot Water at a particular point in time. If this is accurate, it allows the Hot Water heating periods to be filtered out from the results, providing a more representative view of the heat required for Space Heating. However, it’s clear that many systems don’t accurately report Space Heating mode – so the overall list is unrepresentative. It can be useful to filter out Hot Water production for a single system where the data is known to be accurate.

In my case, looking only at Space Heating drops the kWh / m2 from 13.8 to 13.1, demonstrating that this is even more compliant with the 15.0 kWh / m2 Passivhaus limit (even though the target indoor temperature is 21C, rather than 20C).

Ubiquiti UniFi Network Switch Management VLAN Issues

After swapping out the 9U network equipment rack in the House for a deeper, 12U alternative (to house some extra equipment in the House and free up the 9U unit for the Outbuildings) – which meant powering-off the network switches for a few hours – one of the two switches wasn’t connecting back to the UniFi Controller afterwards. Since the other switch and all of the Wireless Access Points connected OK, that ruled out issues with the DHCP server and the Controller itself, and pointed to a configuration issue with that one switch – especially since the other switch was actually connecting via the problematic switch’s network cabling.

In operational terms, the switch was working fine, passing traffic as expected, but was ‘unmanageable’ in that there was no way to change any of its settings, which I knew was going to be a problem.

While the switches were removed from the rack, I’d noticed they have an RJ45 port on the back, labelled ‘Console’. Using that with a ‘rollover’ RJ45-to-DB9 adaptor, connected via a USB to RS-232 lead, I was able to connect to the CLI via a terminal emulator and login with the same credentials used to login to the Controller.

After a lot of head-scratching, I concluded the switch’s management interface (eth0) probably wasn’t on the correct VLAN – I could see it sending DHCP request packets but they weren’t showing up in the right place on the DHCP server. The management interface is intended to be moved to a non-standard management VLAN via a ‘Network Override’ setting in the configuration for the switch (and I could see switch.managementvlan set correctly in file /tmp/system.cfg). What I failed to un-pick was the mechanism by which that management interface gets placed on the correct VLAN – I had hoped to be able to see what was happening and try to correct it.

The solution came by finding references to the ‘enable’ configuration utility which looks like it’s meant to make UniFi switches behave similarly to other brands. There’s a good summary here: https://dan.langille.org/2018/01/12/getting-into-the-cli-for-a-unifi-switch/ – which includes the specific commands for changing the VLAN of the management interface (which had indeed reverted to the default, VLAN 1). After changing the setting (and running write memory) everything started working (the switch retries the DHCP request automatically).

So, in summary: it’s not clear why it lost that one setting (while retaining all the others) but it’s good that there was a way to get things working again without having to factory-reset the switch and re-specify all the configuration.

Update 2025-11-10

The same thing happened to the ‘other’ switch – it reverted the Management VLAN to 1. The same fix worked, but just in case the referenced web page goes away here’s a summary of the steps required:

  1. Connect to the switch’s Console port using a serial cable and ‘rollover’ adaptor
  2. Login using the same credentials used for the UniFi Controller
  3. Telnet to the switch to get the management interface:
    • telnet 127.0.0.1 2222
    • (Hit ‘enter’ a second time to display the command prompt)
  4. Run the enable command to get into configuration mode
  5. Run the show network command to check the current settings
  6. Run the network mgt_vlan 254 command to set the correct management vlan
  7. Run the write memory command to save the changes
  8. Run the exit command (twice) to back out of the management interface
  9. Wait for the DHCP request to work on the right VLAN